PREEMPTIVE_OS_AUTHORIZATIONOPS waits in SQL Server

SQL Server threads which are controlled by SOS (SQL Server operating system) are Non preemptive but at times they switch preemptive when they can’t obey the rules of SOS. Some common places when SOS thread is switched preemptive are when we call extended proc’s, few Windows API etc.


Let us assume you use “execute as user x” in your job, SQL Server calls Windows functions like LookupAccountName  to get the credential of user. Windows functions interacts with AD services to get the credentials of account and return the info to the caller in SQL Server process and then SQL Server would build the logintoken. If there is a delay in AD and if it takes long time to respond to the windows function calls other threads in the same scheduler would get blocked so SQL Server thread would switch preemptive (Doesn’t follow SOS rules) before  making these  function  calls. PREEMPTIVE_OS_AUTHORIZATIONOPS wait type would occur when a thread is waiting on such windows functions (security) to return, So first thing which would have to do is to fix the performance of AD calls.


To narrow down and prove that this issue occurs because of Active directory performance. Login to SQL server using the startup account of SQL Server and execute below query when you notice PREEMPTIVE_OS_AUTHORIZATIONOPS wait type and compare the times printed. It will give you the time it takes for SQL Server to complete the AD calls.


create procedure PREEMPTIVEOSAUTHORIZATIONOPS  with execute as self

as

set nocount on

select CONVERT(varchar, getdate(), 126) PREEMPTIVEOSAUTHORIZATIONOPS

go

print convert(varchar, getdate(), 126)

exec dbo.PREEMPTIVEOSAUTHORIZATIONOPS;    

print convert(varchar, getdate(), 126)

go

SQL Server Backup compression

How to do Backup compression in SQL Server?

The backup compression  option determines whether SQL Server creates compressed or uncompressed backups .Backup compression option is off by default in SQL Server.The default behavior  can be modified by sp_configure option “backup compression default” .

Syntax:

USE master;
GO
EXEC sp_configure ‘backup compression default’, ‘1’;
RECONFIGURE WITH OVERRIDE;

To override the backup compression:

You can change the backup compression behavior for an individual backup by using WITH NO_COMPRESSION or WITH COMPRESSION in a BACKUP statement. We cannot take compressed and non-compressed backups on the same file. If we take COMPRESSION  backup on a file were  already non-compressed backup has taken,error will be shown.So we have to use different files for compressed and uncompressed backup.

Example to take backup for AdventureWorks with NO_COMPRESSION:

BACKUP DATABASE [AdventureWorks] TO  DISK = N’C:\Program Files\Microsoft SQL Server\MSSQL11.MSSQLSERVER\MSSQL\Backup\uncompressed.bak’ WITH NO_COMPRESSION
GO

Example to take backup for AdventureWorks WITH COMPRESSION:

BACKUP DATABASE [AdventureWorks] TO  DISK = N’C:\Program Files\Microsoft SQL Server\MSSQL11.MSSQLSERVER\MSSQL\Backup\compressed.bak’ WITH COMPRESSION
GO

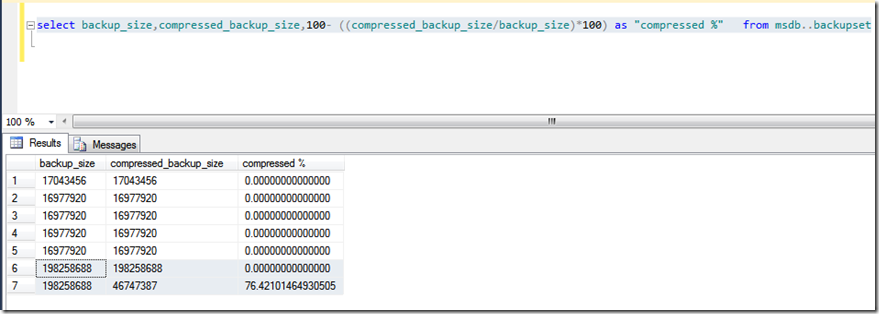
To calculate the compression ratio of a backup:

After taking backup with compression and without compression the backup_size can be compared to see the difference.

Syntax:

select backup_size,compressed_backup_size,100- ((compressed_backup_size/backup_size)*100) as “compressed %”   from msdb..backupset

 image

Types of isolation levels in SQL Server

The ISO standard defines the following isolation levels in SQL Server Database Engine:  

Microsoft SQL Server supports these transaction isolation levels:

Read Committed

SQL Server acquires a share lock while reading a row into a cursor but frees the lock immediately after reading the row. Because shared lock requests are blocked by an exclusive lock, a cursor is prevented from reading a row that another task has updated but not yet committed. Read committed is the default isolation level setting for both SQL Server and ODBC.

Read Uncommitted

SQL Server requests no locks while reading a row into a cursor and honors no exclusive locks. Cursors can be populated with values that have already been updated but not yet committed. The user is bypassing all of the locking transaction control mechanisms in SQL Server.

Repeatable Read 

SQL Server requests a shared lock on each row as it is read into the cursor as in READ COMMITTED, but if the cursor is opened within a transaction, the shared locks are held until the end of the transaction instead of being freed after the row is read. So phantom rows are This has the same effect as specifying HOLDLOCK on a SELECT statement.

(Phantom read:Phantom reads occurs when an insert or delete action is performed against a row that is being read by a transaction.The second  transaction read shows a row that did not exist in the original read as the result of an insertion by a different transaction or due to deletion operation some rows  doesn’t appear)

Serializable

     In serializable read phantom reads are not allowed because while the first transaction is in progress other transaction wont execute.

Snapshot

SQL Server requests no locks while reading a row into a cursor and honors no exclusive locks. Cursor is populated with the values as of the time when the transaction first started. Scroll locks are still requested regardless of use of snapshot isolation.


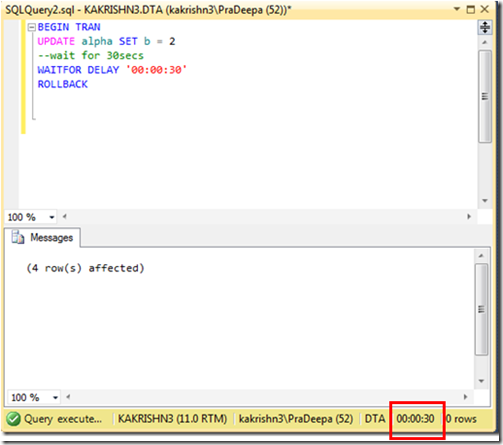
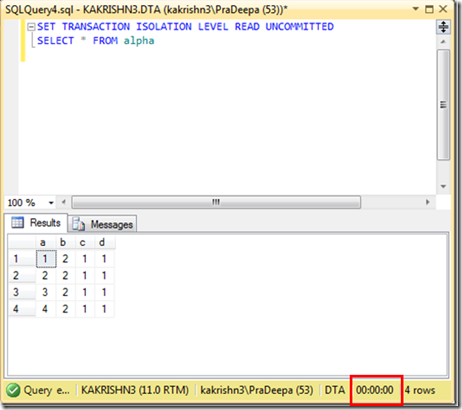
Read uncommitted example: Uncommitted Read allows your transaction to read any data that is currently on a data page, whether that has been committed or not. For example,another user might have a transaction in progress that has updated data, and even though it’s holding exclusive locks on the data, your transaction can read it anyway.

image

If we execute the select query before the update transaction gets committed,it will not wait for the update transaction to commits.Query will be executed immediately without any time lapse.

image

Read Committed example

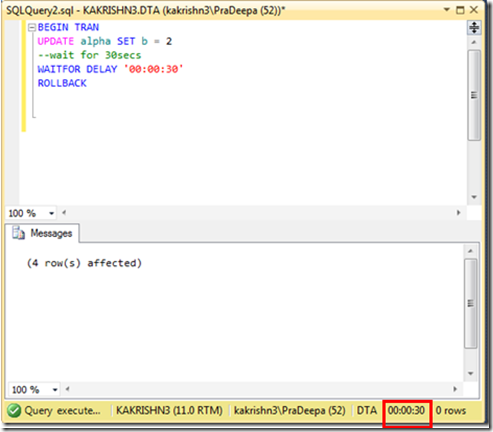
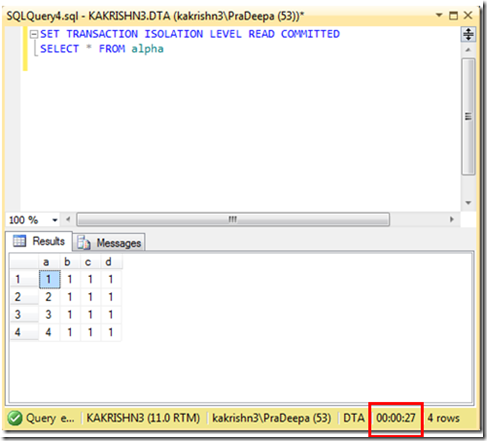
Read committed allows your transaction to read only if the data is committed.Read Committed operation never reads data that another application has changed but not yet committed.

image

If we execute the select query before the update transaction gets committed,it will wait till the update transaction gets committed.

image

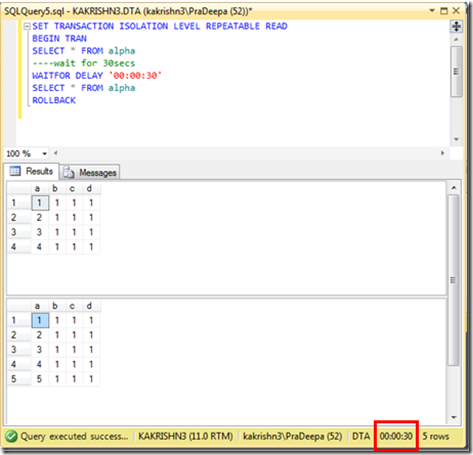
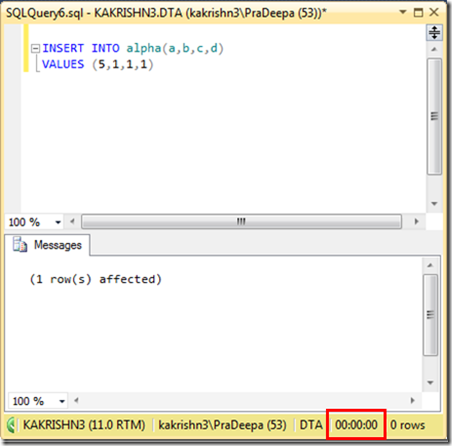
Repeatable Read example :In Repeatable Read issuing the same query twice within a transaction will not make any changes to data values made by another user’s transaction.Repeatable Read allows phantom reads(Data getting changed in current transaction by other transactions is called Phantom Reads).So phantom rows will appear.

image

While the transaction(first query) is in progress,repeatable read allows another transaction(second query) to execute.It means it allow phantom reads.So second transaction(second query),need not wait till first transaction(first query) completes.Here values will be added before first query completes.

image

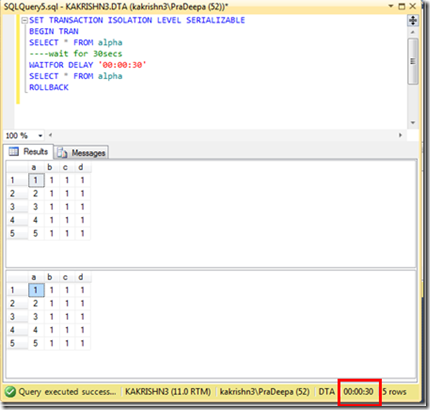
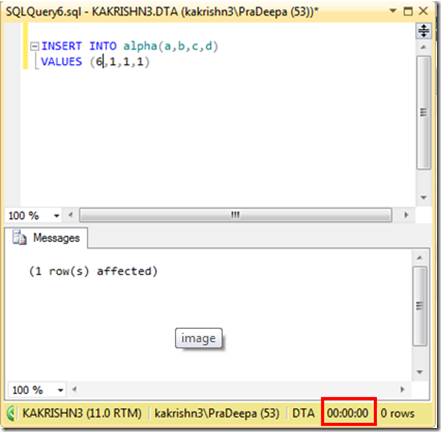
Serializable example : The Serializable isolation level adds to the properties of Repeatable Read by ensuring that if a query is reissued, rows will not have been added in the table. In other words, phantoms will not appear if the same query is issued twice within a transaction.

image

While the transaction(first query) is in progress,serializable read does not  allow another transaction(second query),It means it don’t allow phantom reads.So second transaction(second query), must wait till first transaction(first query) completes.Here values will be added only after first query completes.

image

snapshot example : To use the snapshot isolation level you need to enable it on the database by running the following command

ALTER DATABASE DBname
SET ALLOW_SNAPSHOT_ISOLATION ON

SQL Server database snapshot

What is the use of SQL Server database snapshot and how to create SQL Server database snapshot?

Database snapshots are available only in SQL Server 2005 Enterprise Edition and later versions. All recovery models support database snapshots.

A database snapshot is a read-only, static view of the source database.Multiple snapshots can exist on a source database and always reside on the same server instance as the database. Each database snapshot is transactionally consistent with the source database as of the moment of the snapshot’s creation.A snapshot persists until it is explicitly dropped by the database owner.

Snapshots can be used for reporting purposes.In the event of a user error on a source database, you can revert the source database to the state it was in when the snapshot was created. Data loss is confined to updates to the database since the snapshot’s creation.

Creating a series of snapshots over time captures sequential snapshots of the source database. Each snapshot exist until it is dropped.Each snapshot will continue to grow as  pages in original database are updated, you may want to conserve disk space by deleting an older snapshot after creating a new snapshot.

Steps to create database snapshot in SQL Server:

1.Create a new database or use existing database to create the database snapshots.

Syntax:

USE master
GO
— Create database
CREATE DATABASE test
GO
USE test
GO

2.Create table  and Insert values into table.

Syntax:

–create a Table
CREATE TABLE test1 (a INT, b INT,c INT)
—Insert values
declare @a nchar(10)
set @a=1
while (@a<5)
begin
insert into test1 values (@a,’1′,’1′)
set @a=@a+1
end

3.Create a snapshot  for a source database.

Syntax:

— Create Snapshot Database
CREATE DATABASE Snapshottest ON
(Name =’test’,
FileName=’C:\Program Files\Microsoft SQL Server\MSSQL11.MSSQLSERVER\MSSQL\DATA\testsnap.ss’)
AS SNAPSHOT OF test;
GO
image

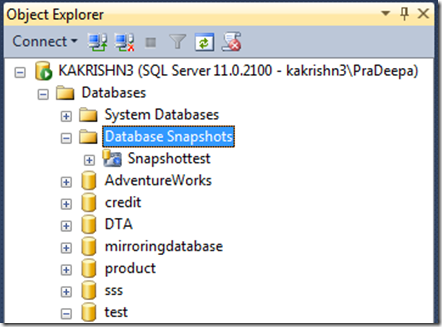
Snapshottest database is created successfully.

4.Now let us view both the source database and snapshot database.

Syntax:

SELECT * FROM test.dbo.test1;
Go
SELECT * FROM Snapshottest.dbo.test1;
Go

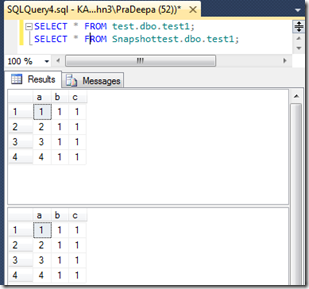
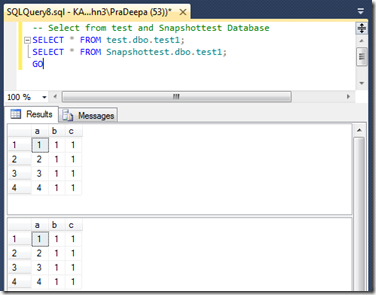
Data’s in tables of source and snapshot database are same.
 image

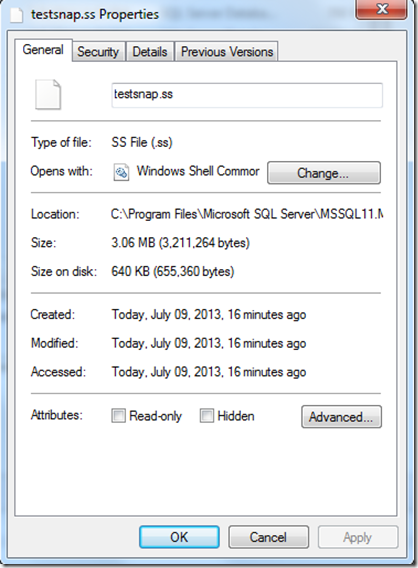
Size on disk  of the testsnap .ss could be viewed by opening its properties window.Let us note the  size on disk  of the source database.
image

5.Let us update existing rows in the table.

Syntax:

update test1 set a=0,b=0,c=0

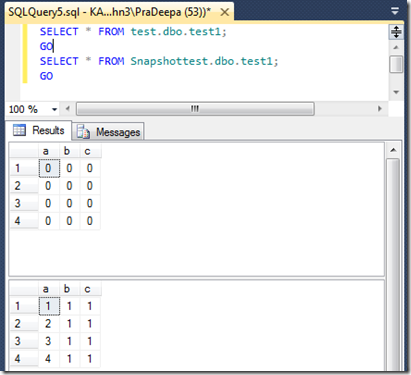
6.After updating rows ,let us view the source and snapshot database.The values are updated only in source database,not in snapshot database.Because snapshot database is consistent with the source database as of the moment of the snapshot’s creation.

Syntax:

— Select from test and Snapshottest Database
SELECT * FROM test.dbo.test1;
SELECT * FROM Snapshottest.dbo.test1;
GO
image 

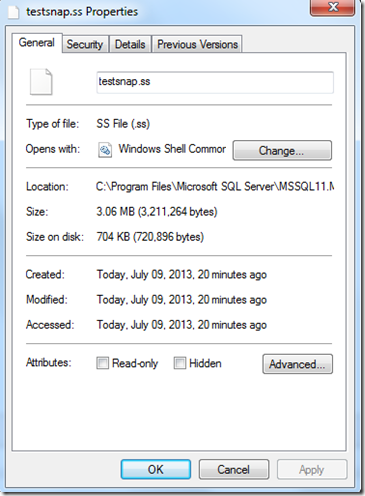
But size on disk is increased,It clearly shows that when we update data in Source database, it copies the old/existing data pages to Snapshot database. This is the reason why the size of the snapshot database is increasing while updating the source database.
image

7.We could revert the source database.Reverting overwrites updates made to the source database since the snapshot was created by copying the pages from the sparse files back into the source database.

Syntax:

— Restore old data from Snapshot Database
USE master
GO
RESTORE DATABASE test
FROM DATABASE_SNAPSHOT = ‘Snapshottest’;

8.View the data in the tables from the source and the snapshot database after the restore from snapshot.

Syntax:

SELECT * FROM test.dbo.test1;
Go
SELECT * FROM Snapshottest.dbo.test1;
Go
image

9.We drop the snapshot database like any other database using drop database command.

Syntax:

— drop snapshottest
DROP DATABASE [snapshottest];

10. We can also create database snapshot on mirror database for load balancing.
How to create table with filestream column and Insert data

How to create table with filestream column and Insert data?

Filestream data type in SQL Server  can be used to store images,documents,etc., in database.

In this blog I will explain how to create table with filestream data type.

Before creating table with filestream  column,we have to enable filestream feature in SQL Server configuration manager.Follow “How to enable and configure Filestream in SQL SERVER 2008 / 2012

Create a table and adding filestream data:

1.Create Filestream enabled database.

Syntax:

CREATE DATABASE test
ON
PRIMARY ( NAME = test1,
    FILENAME = ‘c:\data\testdat1.mdf’),
FILEGROUP FileStreamGroup1 CONTAINS FILESTREAM( NAME = test3,
    FILENAME = ‘c:\data\test1’)
LOG ON  ( NAME = testlog1,
    FILENAME = ‘c:\data\test1.ldf’)
GO

2.After you have a filestream enabled database.we now need to create a table and add data to it.

Syntax:

CREATE TABLE [dbo].[test](
   [ID] UNIQUEIDENTIFIER ROWGUIDCOL NOT NULL UNIQUE,
   [Number] VARCHAR(20),
   [Description] VARCHAR(50),
   [Image] VARBINARY(MAX) FILESTREAM NULL
)

3.Insert values into table. In below example I am inserting image file in to the table. 

Syntax:

DECLARE @img AS VARBINARY(MAX)
— Load the image data
SELECT @img = CAST(bulkcolumn AS VARBINARY(MAX))
      FROM OPENROWSET(Bulk  ‘C:\image\jellyfish.jpg’, SINGLE_BLOB ) AS y
— Insert the data to the table         
INSERT INTO test (ID,Number,Description, Image)
SELECT NEWID(), ‘MS1001′,’jellyfish’, @img

clip_image001[8]

4.To view the table with filestream included column

image

NON CLUSTERED COLUMNSTORE INDEX

What is non clustered column store index in SQL Server?

Column store index is a new feature introduced in SQL Sever 2012.In Non clustered column store index data is stored as column.Column order is not important in column store index.In this non clustered column store index we don’t have traditional row execution mode instead of that,we have batch execution mode.This improves query execution.Batch execution mode  executes several rows at a time as a batch.This reduces CPU consumption.

In column store execution, only columns that query needs will be read.This reduces I/O and memory utilization.

We cant have Unique,Primary or Foreign key constraints in column store index and also it does not have feature like INCLUDE.Once we have created the Non clustered column store index for a table,we can’t update the table with new values because the table is READ-ONLY.We could have only one non clustered column store index.Column store index could have only 1024 columns.And we don’t have clustered column store index only Non clustered is available.

This column store index uses the benefits of segment elimination based on some conditions.It gives faster performance for common data warehousing queries.

Create a Column Store Index in SQL Server by using below steps.

Using GUI:

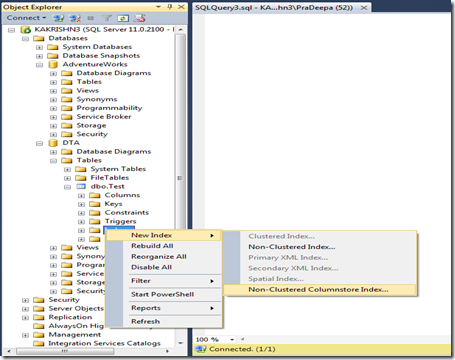
1.In Object Explorer, expand Tables, right click -> Indexes and click New Index. Select non clustered column store index .


image

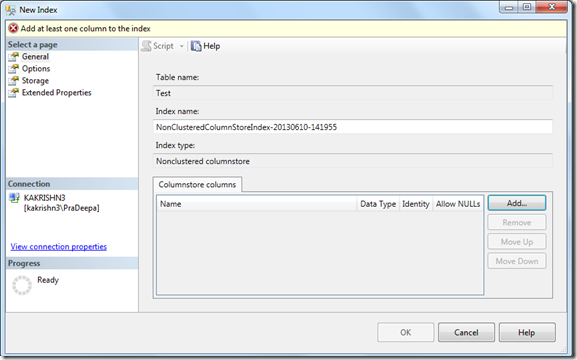
2.Add the column store columns.

image

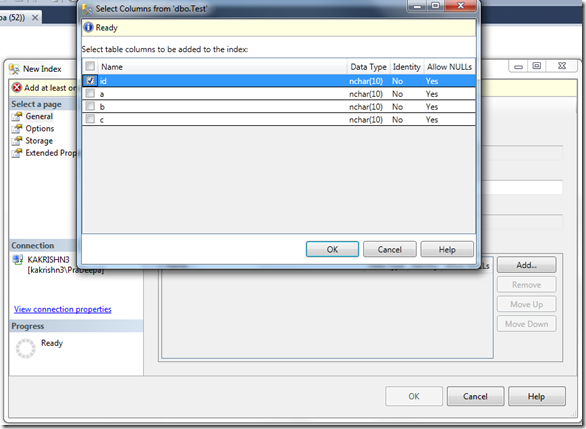
  •   select the table column to be added to the index.


image

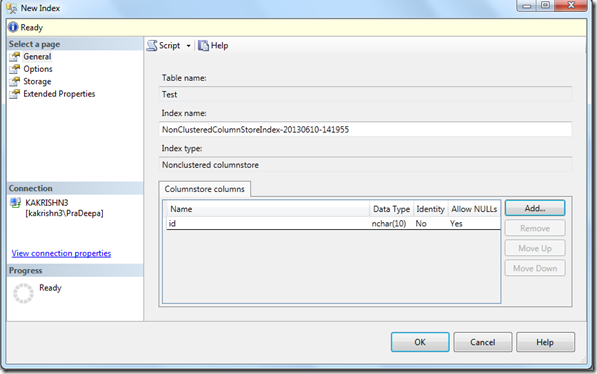
  • Selected Column store column will be added.


image

3.Set the options by selecting options from select page.In that give the value for Max degree of parallelism as greater than or equal to (2) to have batch execution.

Set other extended properties you need by clicking extended properties node.


image

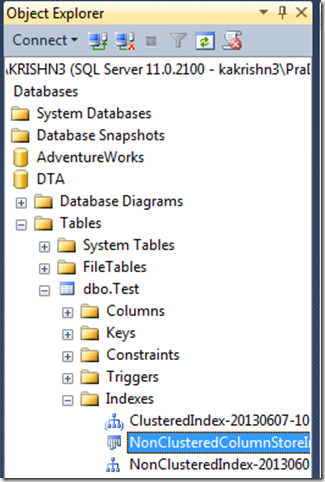
4.Non clustered column store index is successfully created.

image

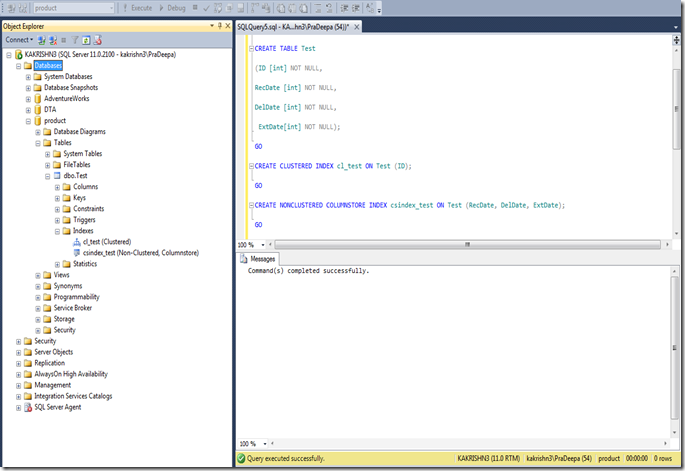
USING T-SQL:

NONCLUSTERED COLUMNSTORE index without options:

Create database product;

Use product;

CREATE TABLE Test

(ID [int] NOT NULL,

RecDate [int] NOT NULL,

DelDate [int] NOT NULL,

ExtDate[int] NOT NULL);

GO

CREATE CLUSTERED INDEX cl_test ON Test (ID);

GO

CREATE NONCLUSTERED COLUMNSTORE INDEX csindex_test ON Test (RecDate, DelDate, ExtDate);

GO                                

                                                (or)

NONCLUSTERED COLUMNSTORE index with options:

CREATE NONCLUSTERED COLUMNSTORE INDEX csindex_test ON Test

(RecDate, DelDate, ExtDate)

WITH

(DROP_EXISTING = ON, MAXDOP = 2)

ON “default”

GO

image

How to create clustered and non-clustered index

Index is a database object, which can be created on one or more columns(max 16 columns).The index will improve the performance of data retrieval and adding.indexes are created in an existing table to locate rows quickly and efficiently.

What is clustered index?

Table can have only one clustered index.In clustered index data’s in table is sorted in particular order based on index keys(either AESC/DESC).In clustered index page chain that holds data pages is also sorted in same order as index keys.So,SQL server follows the page chain in order to retrieve the data rows.By this new rows could be added just by adjusting the links in the page chain without moving entire pages.The leaf nodes of a clustered index contains the data pages with index keys.
What is Non clustered index?
For a table we could have more than one non clustered index because it doesn’t affect data pages organization.The leaf node of a non clustered index does not consist of data pages. Instead, the leaf nodes contain index rows.If we have both the clustered index and non clustered index for a table then index row will have Clustered index key columns that point to the data row. If there is no clustered index then the index row contains Non-Clustered index key columns which is stored along with row locator (or)  row identifier.The pointer from an index row to a data row is called a row locator.
Both clustered and non clustered indexes can be unique. That is no two rows can have the same value for the index key. Also we have one special type of index called Non clustered column store index.
 
Creating a clustered index  using Object Explorer:
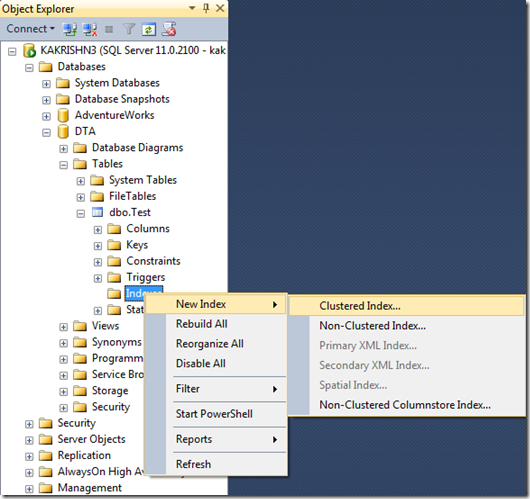
1.In Object Explorer, expand the table for which you want to create a clustered index.

image

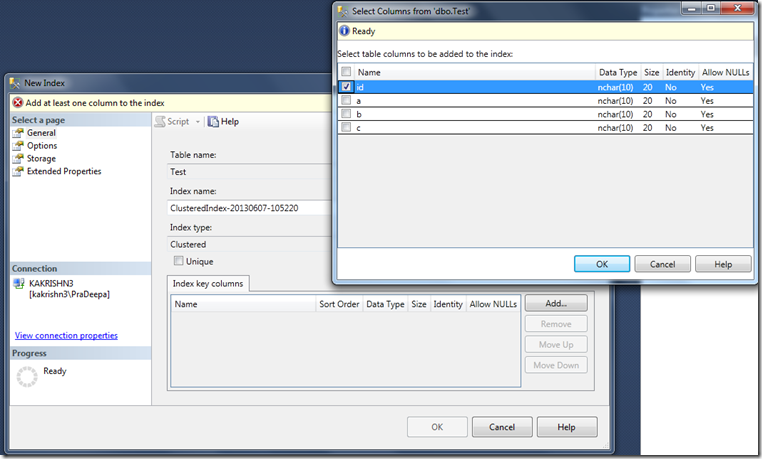
2.Following window will allow as to select the key columns for index.

image

3.We could add other options by selecting options node from select page.


image

4.Click ok.Clustered index will be created.

Create Non-Clustered index using object explorer:

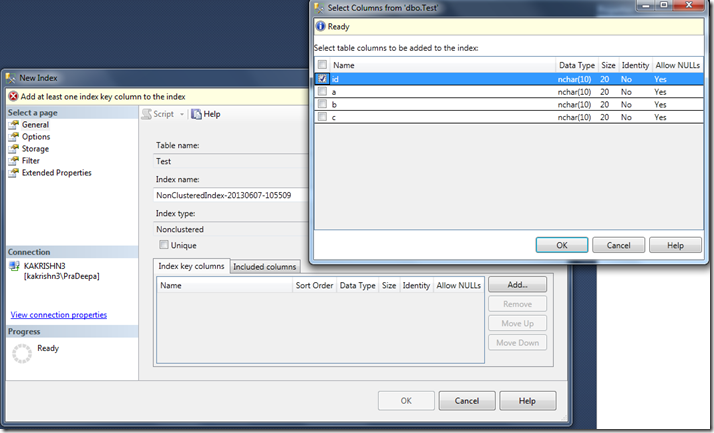
1.Similarly Select Non clustered index from New index.Select the Key columns for an index.

image

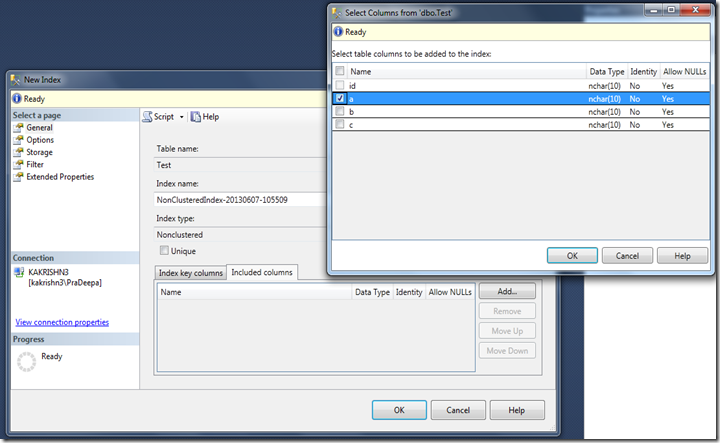
2.In non clustered index we could add included columns for your index.In order to overcome existing index limits.After including needed included columns ,Click ok.

image

3.Similarly other options could be added by selecting different nodes from select page.

4.Click ok .Index will be created.

Bulk insert fails with error 4861 Cannot bulk load because the file could not be opened

When you do bulk insert in SQL Server it may fail with below error because of double hop .

Error :

Msg 4861, Level 16, State 1, Line 3

Cannot bulk load because the file “\\path\” could not be opened. Operating system error code 5(failed to retrieve text for this error. Reason: 15105).

Steps to fix the above error

1. Connect to SQL Server using SSMS (With account you run bulk insert) and execute below query and check if it is using Kerberos authentication

select net_transport,auth_scheme from sys.dm_exec_connections where session_id=@@spid

2. If the session is not using Kerberos authentication then fix the SPN issues (startup account of SQL Server should have read and write SPN permissions). Account which is running bulk inser should have read SPN permission. Setpn exe or adsiedit can be used to add or display all the SPN’s. If the SPn’s are registered properly and still connection fails to NTLM then get the output of SSPIClient.exe and verify why Kerberos authentication fails.

3. Make sure the account which is running bulk insert is trusted for delegation in Active Directory.

4. Account which is running bulk insert should have access to the shared directory in which BCP files are placed.

Reference  BULK INSERT (Transact-SQL) 

http://msdn.microsoft.com/en-us/library/ms188365.aspx

Security Account Delegation (Impersonation)

If a SQL Server user is logged in using Windows Authentication, the user can read only the files accessible to the user account, independent of the security profile of the SQL Server process.

When executing the BULK INSERT statement by using sqlcmd or osql, from one computer, inserting data into SQL Server on a second computer, and specifying a data_file on third computer by using a UNC path, you may receive a 4861 error.

To resolve this error, use SQL Server Authentication and specify a SQL Server login that uses the security profile of the SQL Server process account, or configure Windows to enable security account delegation. For information about how to enable a user account to be trusted for delegation, see Windows Help.

For more information about this and other security considerations for using BULK INSERT, see Import Bulk Data by Using BULK INSERT or OPENROWSET(BULK…) (SQL Server).

How to create backups using database maintenance plan

You can create a database maintenance plan to automate the SQL Server database backups. SQL Server backup maintenance plan can be scheduled to backup the databases automatically or executed manually.

Follow the steps below to create a database backup maintenance plan and schedule it to execute automatically

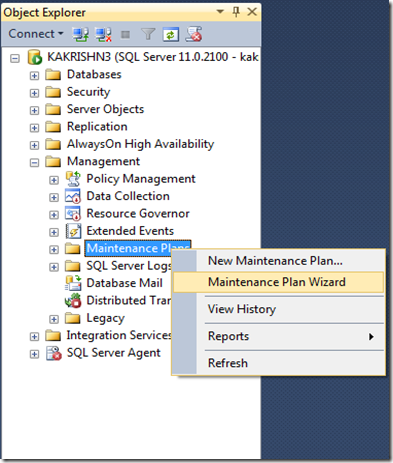
1.Open SQL Server Management Studio, expand the Management node, and then expand the Management Plans node.


image

2.Right-click Maintenance Plans, click Maintenance Plan Wizard.

image 

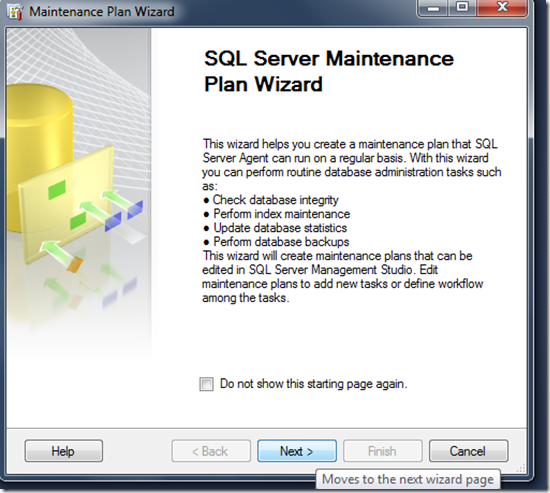
3.SQL Server Maintenance Plan Wizard window will appear.click next.

image

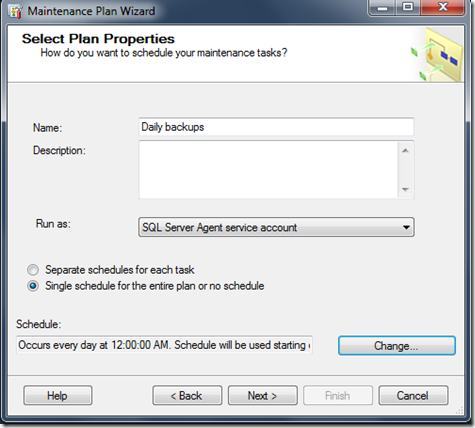
4.Then type  a name for this database backup plan.

image


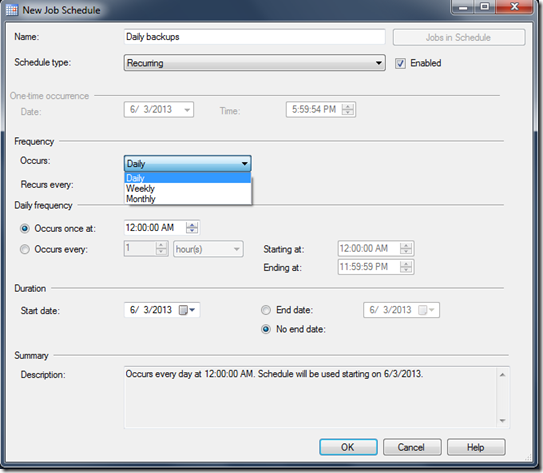
  • Select schedule according to your need.Generally daily,weekly,monthly or hourly.


image


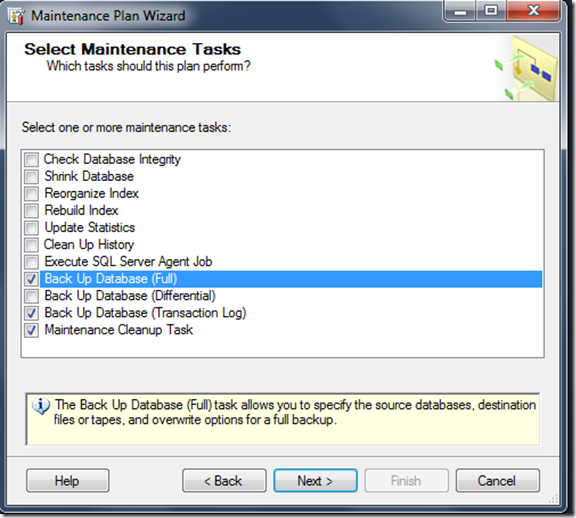
5.Select  the maintenance tasks,which you wanted to plan.

image

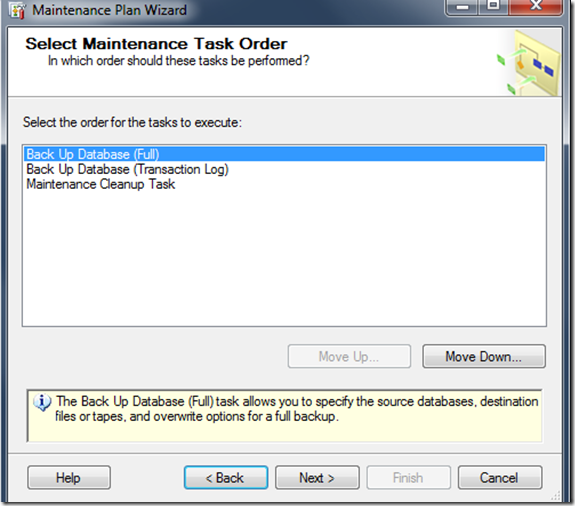
6.select the order of your plan.Click Next.

image

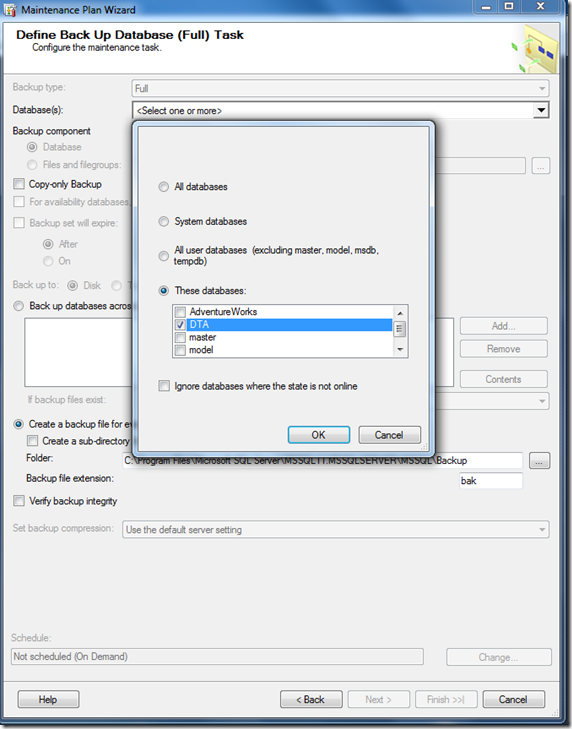
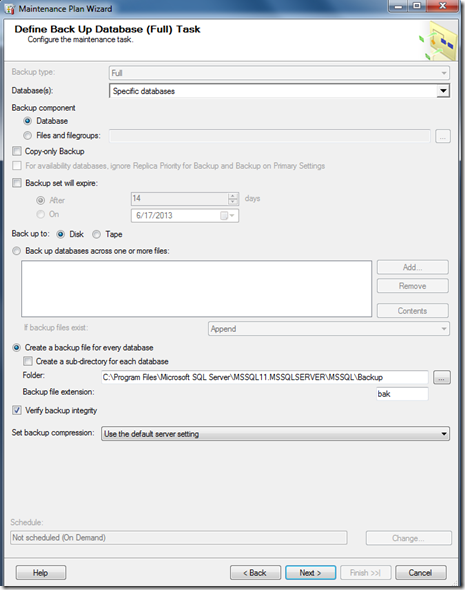
7.On the Define Back Up Database (Full) Task dialog box, specify information about the full backup. Specify database where this plan has to be applied.Press ok.Then Click Next.

image

image

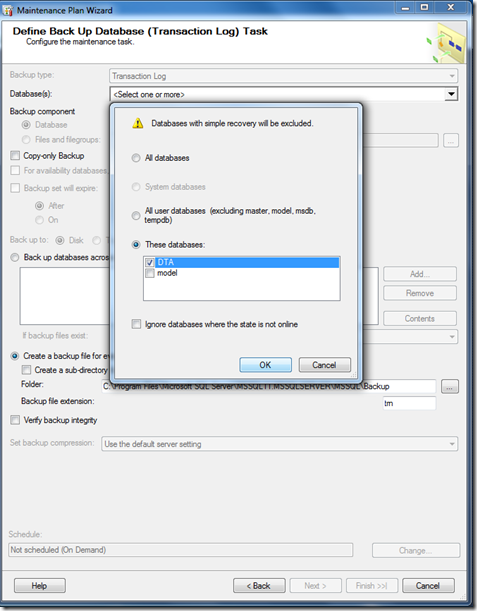
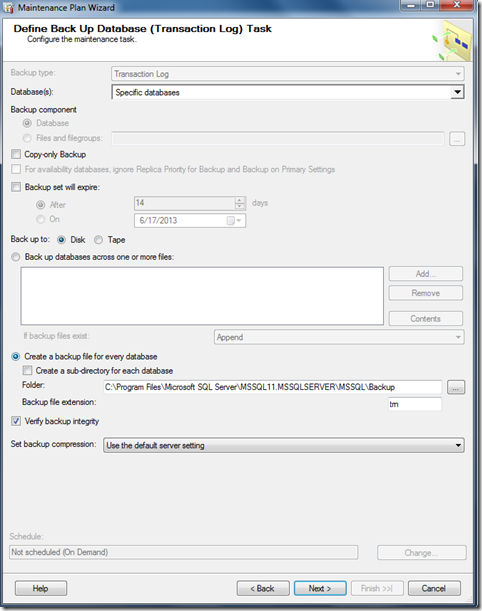
8.On the Define Back Up Database (Transaction Log) Task dialog box, configure the transaction log backup. Click Next.

image

9. Choose the backup destination

image

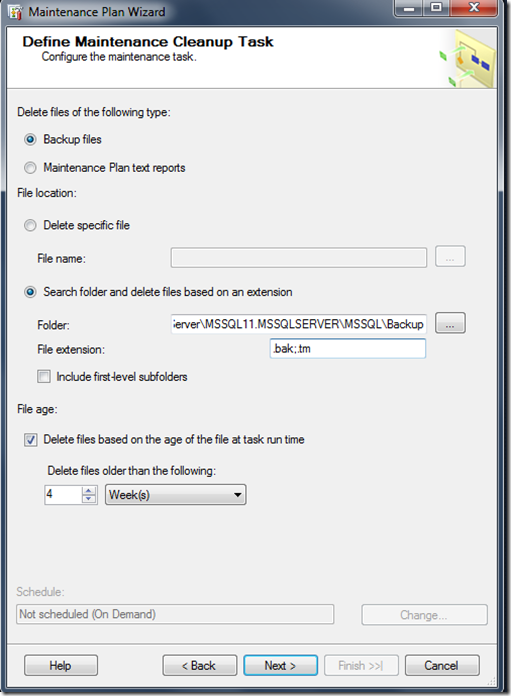
10.On the Define Maintenance Cleanup Task dialog box, configure the cleanup tasks.specify the folder name where you take backups.Then specify the backup folders extension.Click Next.

image

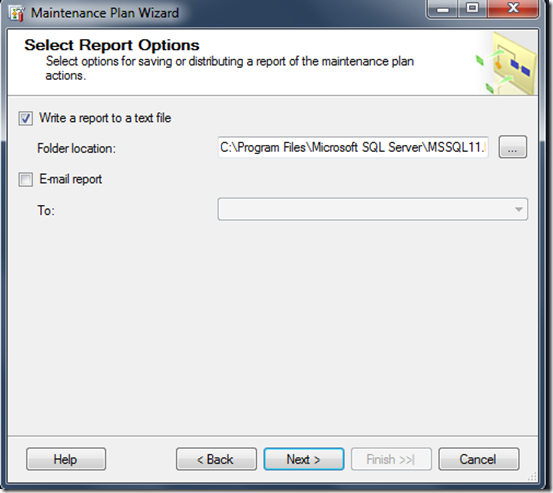
11.On the Select Report Options dialog box, select whether to write the report to text file or send the report through email. Click Next.

image

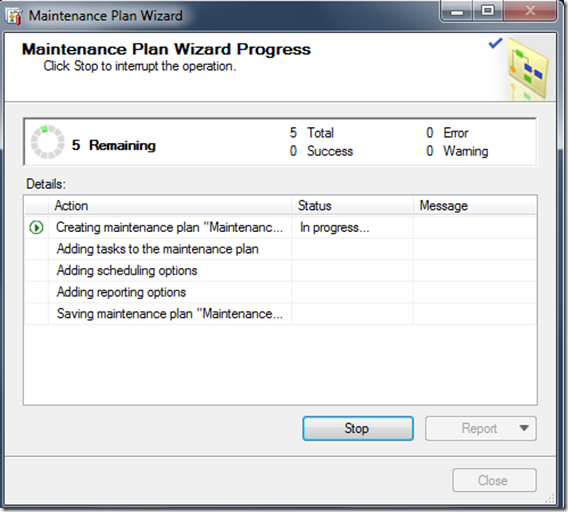
  • Plan is in progress

image


image

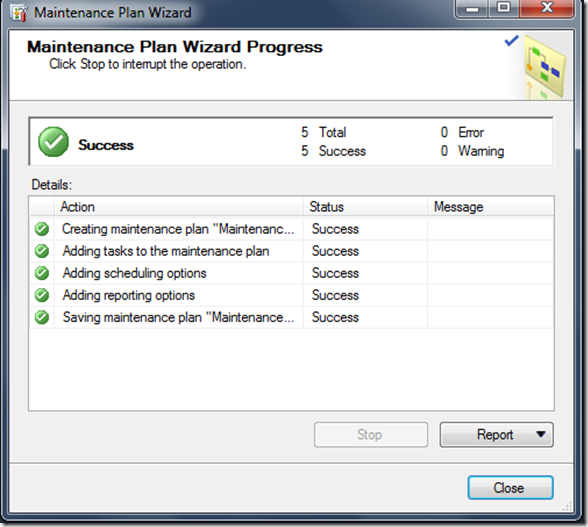
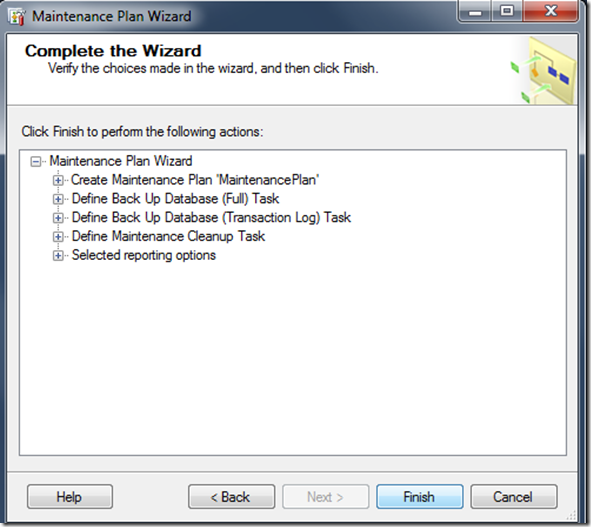
12.Maintenance plan wizard is successfully created.Click Finish

image

How to set Max degree of parallelism (MAXDOP)

Max degrees of parallelism (a.k.a MAXDOP) in SQL Server is used to control the maximum number of threads per execution plan operators work.MAXDOP does not restrict the number of CPU’s/Threads used by single batch or Query.

Ideally MAXDOP should be equal to number of online schedulers per node. You can use the below query to get the number of  online schedulers per node. All the parallel threads for the tasks of the query will be assigned from schedulers of same node so having MAXDOP beyond the number of online schedulers per node may not really improve the performance (With some exceptions).  

select count(*) as Maxdopcount, parent_node_id from sys.dm_os_schedulers
 where status='VISIBLE ONLINE' group by parent_node_id

Depending upon the workload in your environment you may increase or decrease the value.

Note: Always ensure you have same number of online schedulers in each node else you may face uneven workload and memory distribution among the SQL Server schedulers more details in SQL Server NUMA load distribution.

To configure Max degree of parallelism follow the below steps.

1.Connect to the Database Engine.

2.From the Standard bar, click New Query.

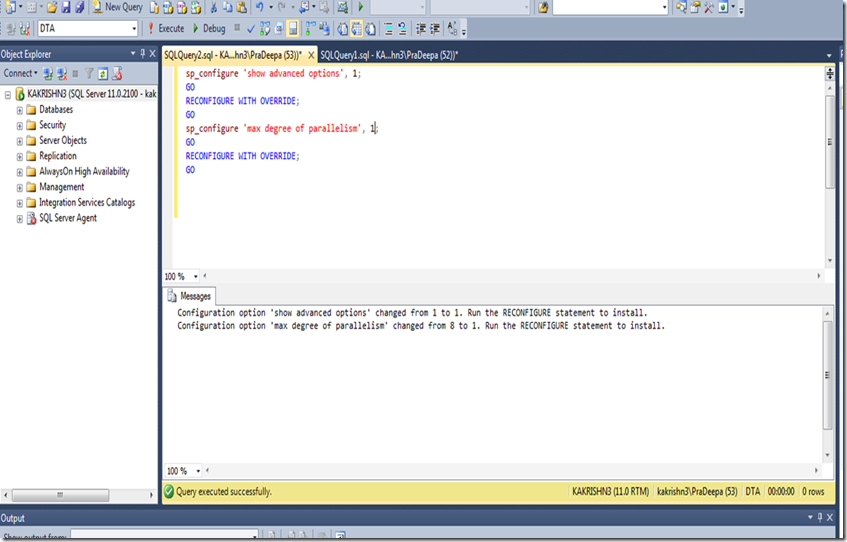
3.Then execute the following query.

Syntax:

</pre>
sp_configure 'show advanced options', 1;

GO

RECONFIGURE WITH OVERRIDE;

GO

sp_configure 'max degree of parallelism', 1; /*Replace 1 with your preferred MAXDOP value */

GO

RECONFIGURE WITH OVERRIDE;

GO

<span style="font-family: Consolas, Monaco, monospace; font-size: 12px; line-height: 18px;">


image

Method2

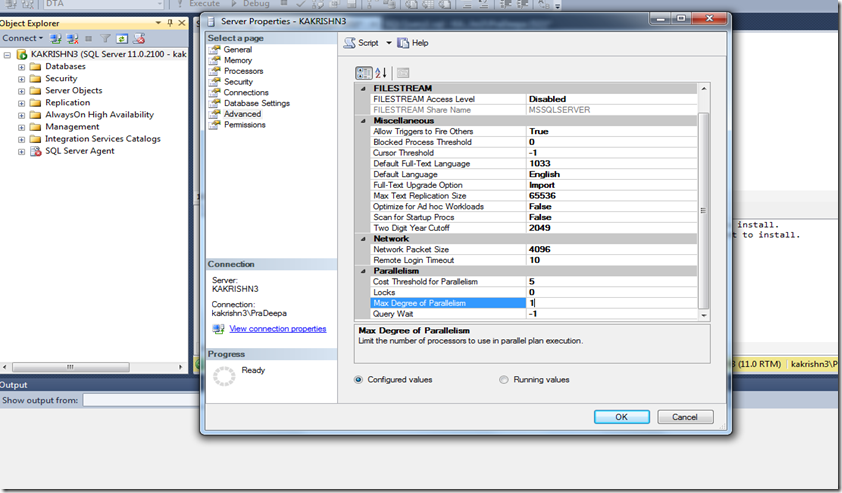
1.In Object Explorer, right-click a server and select Properties.

2.Click  Advanced  from select a page.

3.In the Max Degree of Parallelism box, select the maximum number of processors to use in parallel plan execution.

image

Capture context switches from dm_os_ring_buffers

You can use the below query to extract the context switches information from ring buffers and time each thread spend owning the scheduler.

SELECT  
dateadd (ms, (a.[timestamp] - tme.ms_ticks), GETDATE()) as Time_Stamp,
a.*
FROM
(SELECT 
	  y as timestamp,	
      x.value('(//Record/@id)[1]', 'bigint') AS [Record Id],
      x.value('(//Record/@type)[1]', 'varchar(30)') AS [Type],
      x.value('(//Record/@time)[1]', 'bigint') AS [Time],
      x.value('(//Record/Scheduler/@address)[1]', 'varchar(30)') AS [Scheduler Address],
      x.value('(//Record/Scheduler/Action)[1]', 'varchar(30)') AS [Scheduler Action],
      x.value('(//Record/Scheduler/CPUTicks)[1]', 'bigint') AS [Scheduler CPUTicks],
      x.value('(//Record/Scheduler/TickCount)[1]', 'bigint') AS [Scheduler TickCount],
      x.value('(//Record/Scheduler/SourceWorker)[1]', 'varchar(30)') AS [Scheduler SourceWorker],
      x.value('(//Record/Scheduler/TargetWorker)[1]', 'varchar(30)') AS [Scheduler TargetWorker],
      x.value('(//Record/Scheduler/WorkerSignalTime)[1]', 'bigint') AS [Scheduler WorkerSignalTime],
      x.value('(//Record/Scheduler/DiskIOCompleted)[1]', 'bigint') AS [Scheduler DiskIOCompleted],
      x.value('(//Record/Scheduler/TimersExpired)[1]', 'bigint') AS [Scheduler TimersExpired]
FROM
      (SELECT CAST (record as xml),timestamp  
      FROM sys.dm_os_ring_buffers 
      WHERE ring_buffer_type = 'RING_BUFFER_SCHEDULER' ) AS R(x,y)) a
	  cross join sys.dm_os_sys_info tme 
WHERE a.[Scheduler Action] = 'SCHEDULER_SWITCH_CONTEXT'
ORDER BY       a.[Scheduler Address] , [Time_stamp]

Error 601 : Could not continue scan with NOLOCK due to data movement.

When there is corruption in database (or) When scanning the data with the NOLOCK locking hint (or) with the transaction isolation level set to READ UNCOMMITTED, it is possible for the page at the current position of the scan would have deleted or moved by page splits caused by Inserts/Updates/Deletes making SQL Server not able to scan further and cause Error 601 : Could not continue scan with NOLOCK due to data movement.

Resolution
Unless the database has been explicitly marked as ‘read only’ there is no way to guarantee that there are no data modification operations going on.
The possible solutions are:
1. Check for 601 errors from the application and retry the query automatically if the error occurs.
2. Improve the indexes supporting the query or modify the query so that it has a smaller lock footprint and runs more quickly. If the query touches less data it will be less likely to encounter the problem.
3. Avoid use of NOLOCK hint and if necessary have a retry logic 601 error . Improving the indexes as mentioned above might make it possible to get this data without doing large scans that would be likely to cause blocking.
If you don’t use NOLOCK hint or to READ UNCOMMITTED Isolation level then check the database for corruption (Dbcc checkdb)

SQL Server monitoring

Every SQL Server DBA would have faced situations similar to SQL Server not accepting connections for few minutes, SQL Server not responding for few minute or Applications not able to connect with SQL Server for few minutes. Before DBA’s gets alerted about the situation and starts troubleshooting the issue. Everything becomes normal. Challenge in this situations is it becomes very difficult to understand where the underlying problem was, It could be a network connectivity, Application server problem or It might be an issue with SQL Server itself. How do we collect diagnostic data to prove that SQL Server was stable at the time of issue (or) If the issue is with SQL Server then how to collect data we need for diagnosing the issue when there is issue?

SQL Monitor to monitor SQL Server Services

SQL Monitor monitors the SQL Server services and creates log if SQL Server service is down (or) If SQL Server is not accepting (or) SQL Server is not responding to Queries

How it works?

SQL Monitor checks the SQL Server in 3-Phases

1. Check the status of SQL Server service through the windows service control manager

2. If the service is running then check if SQL Server is accepting connections

3. If SQL Server is accepting Connections then probe to perform a simple query and see if SQL Server is responding properly.

4. If SQL Server is not accepting Connections then connect to SQL Server using DAC and take a stack dump.

How to Configure

1. Create a folder call SQLMonitor in C:\

2. Create a Text file called serverlist.txt to fill all the SQLServer information in your account.

Format:

Servername [TAB] Servicename;

Ex:

Server1 MSSQLServer;

Server2 MSSQL$Prod;

3. Invoke command prompt and open attached SQLmonitor.EXE.

Advantage:

1. Multi-threaded . Each server and service is verified using its own thread so retrieving information from one server will not affect the pooling interval to other server.

2. Single exe can be scaled to monitor more than 1000 servers and 1000 services.

3. Uses few MB of memory and system resources.

You can Download SQL Monitor from this link

SQL Server assert in Location: purecall.cpp:51

SQL Server assert in purecall.cpp:51

BEGIN STACK DUMP:

spid 231

Location: purecall.cpp:51

Expression: !”purecall”

SPID: 200

Process ID: 5125

Description: Pure virtual function call

Server Error: 17065, Severity: 16, State: 1.

Server SQL Server Assertion: File: <purecall.cpp>, line = 51 Failed Assertion = ‘!”purecall”‘ Pure virtual function call. This error may be timing-related. If the error persists after rerunning the statement, use DBCC CHECKDB to check the database for structural integrity, or restart the server to ensure in-memory data structures are not corrupted.

Possible causes for above assert are

1. Antivirus softwares which detours in sqlserver address space can inject their instruction in sqlserver modules and can cause this Ex. Sophos etc..

Run select * from sys.dm_os_loaded_modules and check if there are DLL’d loaded from Antivirus (Company column will have the AV company name). If you see any antivrus exclude SQLServer from them.

(or)

Run lm command in the dump and see if there are any Antivirus DLL’s loaded in sqlserver process memory.

2. If you don’t see any Antivirus dll then run windows memory diagnostic tool and check if there are any memory problems on your system( %windir%\system32\MdSched.exe).

3. If there is no antivirus or memory errors follow the steps in http://mssqlwiki.com/2012/10/16/sql-server-exception_access_violation-and-sql-server-assertion/

Trace waits in SQLServer (SQLTRACE_BUFFER_FLUSH,TRACEWRITE,SQLTRACE_WAIT_ENTRIES,SQLTRACE_LOCK)

When you run Profiler trace from client systems or on server with large number of events you will see below wait types.

SQLTRACE_WAIT_ENTRIES
SQLTRACE_LOCK
SQLTRACE_BUFFER_FLUSH
TRACEWRITE

There is no way to completely avoid this wait type without stopping all the traces. We can reduce this waitypes by configuring server side trace instead of client side trace.

select * from sys.traces will give you information about all the traces. ( Status column 0 stopped and 1 active)

For the traces collected using profiler you will find a NULL Path. Profiler traces can cause large number of above waittypes.

Thread which raises the trace event is responsible to Get buffers to write event and write event. So collecting the trace on network share or on slow disk or using profiler can slow down the trace write and make the threads wait, sometimes we may also end with dead locked schedulers.

So ideally you have to avoid running profiler when you see below waits and use sp_trace_create if you like to capture the trace and pass the local path for tracefile parameter.

FILESTREAM feature is disabled

Restore database (or) SQL Server setup fails in script upgrade mode with below error
{
Msg 5591, Level 16, State 4, Line 2
FILESTREAM feature is disabled.
Msg 3013, Level 16, State 1, Line 2
RESTORE DATABASE is terminating abnormally.
}

Follow the steps in http://msdn.microsoft.com/en-us/library/cc645923.aspx and enable File stream, then restore the database.

If the upgrade for SQL Server is failing with error “ESTREAM feature is disabled” then enable file stream in configuration manager by following above article and start SQL Server by following steps mentioned in

 SQL Server2008/SQL Server2012: Script level upgrade for database ‘master’ failed  and run below statement to change file stream access level

sp_configure filestream_access_level, 2
RECONFIGURE with override

After you executed the above statement start the SQL Server normally.

TCP Provider: The semaphore timeout period has expired

TCP Provider: The semaphore timeout period has expired error from SQL Server agent and other applications at times.

1. Disable TCP Chimney.Refer KB:942861

2. If you are in windows 2003 Change the value of the processor affinity to match the number of processors in the system.Follow KB:892100

{
1.Click Start, click Run, type regedit, and then click OK.
2.Expand the following registry subkey:
HKEY_LOCAL_MACHINE\System\CurrentControlSet\Services\NDIS\Parameters
3.Right-click ProcessorAffinityMask, and then click Modify.
4.In the Value data box, type one of the following values, and then click OK:
◦If you have two processors, use the binary value 0b11, or hex value 0x3.
◦If you have three processors, use the binary value 0b111, or hex value 0x7.
◦If you have four processors, use the binary value 0b1111, or hex value 0xF.
5.Quit Registry Editor.
Note The 0x0 or 0xFFFFFFFF values are used to disable the ProcessorAffinityMask entry.
}

3. Check if priority boost is enabled for SQL Server. If yes disable it.

4. Make sure there is no working set trim and system wide memory pressure. You can use second query in significant part of sql server process memory has been paged out to identify and follow the same blog to fix it)

5. Check if paged pool and non-paged is empty. (Event ID:  2019  in event log)

6. If you see this problem in cluster make sure you have set the network priority of “private heart beat” network higher than the “public” network.Refer KB:258750


Unable to connect to Microsoft Distributed Transaction Coordinator (MS DTC) to check the completion status of transaction.

An error occurred while recovering database. Unable to connect to Microsoft Distributed Transaction Coordinator (MS DTC) to check the completion status of transaction.

You might get below errors when you try to restore database from SAN snapshot and see a Orphan Msdtc transaction Spid -2

    Error

Msg 6110, Level 16, State 1, Line 1
The distributed transaction with UOW {00000000-0000-0000-0000-000000000000} does not exist.

An error occurred while recovering database Unable to connect to Microsoft Distributed Transaction Coordinator (MS DTC) to check the completion status of transaction (0:12345). Fix MS DTC, and run recovery again.

    Resolution

Change the sp_configure option
sp_configure ‘in-doubt xact resolution’,2
–Presume abort. Any MS DTC in-doubt transactions are presumed to have aborted.
Go
DBCC dbrecover(‘Dbname’);

Addition details on above sp_configure option in http://msdn.microsoft.com/en-us/library/ms179586(v=sql.90).aspx

Note: Use above option with caution

Query to find SQL Server CPU utilization 2012.

Query to find SQL Server CPU utilization 2012. This query will help you to find the CPU utilization of server and SQL. If like to know the steps to bring down the SQL Server CPU utilization follow http://mssqlwiki.com/2012/10/04/troubleshooting-sql-server-high-cpu-usage/

 	
	declare @ms_now bigint
	select @ms_now = ms_ticks from sys.dm_os_sys_info;
select top 15 record_id,
		dateadd(ms, -1 * (@ms_now - [timestamp]), GetDate()) as EventTime, 
		SQLProcessUtilization,
		SystemIdle,
		100 - SystemIdle - SQLProcessUtilization as OtherProcessUtilization
	from (
		select 
			record.value('(./Record/@id)[1]', 'int') as record_id,
			record.value('(./Record/SchedulerMonitorEvent/SystemHealth/SystemIdle)[1]', 'int') as SystemIdle,
			record.value('(./Record/SchedulerMonitorEvent/SystemHealth/ProcessUtilization)[1]', 'int') as SQLProcessUtilization,
			timestamp
		from (
			select timestamp, convert(xml, record) as record 
			from sys.dm_os_ring_buffers 
			where ring_buffer_type = N'RING_BUFFER_SCHEDULER_MONITOR'
			and record like '%<SystemHealth>%') as x
		) as y 
	order by record_id desc

How to set alternate location for SQL Server dumps?

How to set alternate location for SQL Server dumps?
To change the default location for dump files, you can add the SQLExceptionDumpPath registry key with REG_SZ type under HKLM\Software\Microsoft\<instance path>\Setup  and set the value of this key to the new path. The default location for this is the SQL installation Path\log directory.
Above change does not require restart
HKLM\Software\Microsoft\<instance path>\Setup\MaxDumps    -DWORD to limit maximum number of dumps (0=Unlimited)
HKLM\Software\Microsoft\<instance path>\Setup\MaxFullDumps to limit maximum number of full dumps (0=Unlimited)

How to detect low memory conditions in SQL Server using ring buffers output

Use the below query to determine the low memory conditions in SQL Server using the sys.dm_os_ring_buffers It gives the historical memory usage of SQL Server and internal and external memory pressure information .


SELECT CONVERT (varchar(30), GETDATE(), 121) as [RunTime],
dateadd (ms, (rbf.[timestamp] - tme.ms_ticks), GETDATE()) as [Notification_Time],
cast(record as xml).value('(//Record/ResourceMonitor/Notification)[1]', 'varchar(30)') AS [Notification_type],
cast(record as xml).value('(//Record/MemoryRecord/MemoryUtilization)[1]', 'bigint') AS [MemoryUtilization %],
cast(record as xml).value('(//Record/MemoryNode/@id)[1]', 'bigint') AS [Node Id],
cast(record as xml).value('(//Record/ResourceMonitor/IndicatorsProcess)[1]', 'int') AS [Process_Indicator],
cast(record as xml).value('(//Record/ResourceMonitor/IndicatorsSystem)[1]', 'int') AS [System_Indicator],
cast(record as xml).value('(//Record/ResourceMonitor/Effect/@type)[1]', 'varchar(30)') AS [type],
cast(record as xml).value('(//Record/ResourceMonitor/Effect/@state)[1]', 'varchar(30)') AS [state],
cast(record as xml).value('(//Record/ResourceMonitor/Effect/@reversed)[1]', 'int') AS [reserved],
cast(record as xml).value('(//Record/ResourceMonitor/Effect)[1]', 'bigint') AS [Effect],

cast(record as xml).value('(//Record/ResourceMonitor/Effect[2]/@type)[1]', 'varchar(30)') AS [type],
cast(record as xml).value('(//Record/ResourceMonitor/Effect[2]/@state)[1]', 'varchar(30)') AS [state],
cast(record as xml).value('(//Record/ResourceMonitor/Effect[2]/@reversed)[1]', 'int') AS [reserved],
cast(record as xml).value('(//Record/ResourceMonitor/Effect)[2]', 'bigint') AS [Effect],

cast(record as xml).value('(//Record/ResourceMonitor/Effect[3]/@type)[1]', 'varchar(30)') AS [type],
cast(record as xml).value('(//Record/ResourceMonitor/Effect[3]/@state)[1]', 'varchar(30)') AS [state],
cast(record as xml).value('(//Record/ResourceMonitor/Effect[3]/@reversed)[1]', 'int') AS [reserved],
cast(record as xml).value('(//Record/ResourceMonitor/Effect)[3]', 'bigint') AS [Effect],

cast(record as xml).value('(//Record/MemoryNode/ReservedMemory)[1]', 'bigint') AS [SQL_ReservedMemory_KB],
cast(record as xml).value('(//Record/MemoryNode/CommittedMemory)[1]', 'bigint') AS [SQL_CommittedMemory_KB],
cast(record as xml).value('(//Record/MemoryNode/AWEMemory)[1]', 'bigint') AS [SQL_AWEMemory],
cast(record as xml).value('(//Record/MemoryNode/SinglePagesMemory)[1]', 'bigint') AS [SinglePagesMemory],
cast(record as xml).value('(//Record/MemoryNode/MultiplePagesMemory)[1]', 'bigint') AS [MultiplePagesMemory],
cast(record as xml).value('(//Record/MemoryRecord/TotalPhysicalMemory)[1]', 'bigint') AS [TotalPhysicalMemory_KB],
cast(record as xml).value('(//Record/MemoryRecord/AvailablePhysicalMemory)[1]', 'bigint') AS [AvailablePhysicalMemory_KB],
cast(record as xml).value('(//Record/MemoryRecord/TotalPageFile)[1]', 'bigint') AS [TotalPageFile_KB],
cast(record as xml).value('(//Record/MemoryRecord/AvailablePageFile)[1]', 'bigint') AS [AvailablePageFile_KB],
cast(record as xml).value('(//Record/MemoryRecord/TotalVirtualAddressSpace)[1]', 'bigint') AS [TotalVirtualAddressSpace_KB],
cast(record as xml).value('(//Record/MemoryRecord/AvailableVirtualAddressSpace)[1]', 'bigint') AS [AvailableVirtualAddressSpace_KB],
cast(record as xml).value('(//Record/@id)[1]', 'bigint') AS [Record Id],
cast(record as xml).value('(//Record/@type)[1]', 'varchar(30)') AS [Type],
cast(record as xml).value('(//Record/@time)[1]', 'bigint') AS [Record Time],
tme.ms_ticks as [Current Time]
FROM sys.dm_os_ring_buffers rbf
cross join sys.dm_os_sys_info tme
where rbf.ring_buffer_type = 'RING_BUFFER_RESOURCE_MONITOR' --and cast(record as xml).value('(//Record/ResourceMonitor/Notification)[1]', 'varchar(30)') = 'RESOURCE_MEMPHYSICAL_LOW'
ORDER BY rbf.timestamp ASC
Go

Once you get the output of above query you can use the steps in A significant part of SQL Server process memory has been paged out to troubleshoot the issue further

Linked server performance might be affected because of Remote Scan

In linked server queries when you use filtered query (Where clause) filtering may not be remoted, entire data is fetched locally from remote server and filtering happens locally hence will cause severe performance impact. You will find “Remote Scan”  operator in plan in this case. When filtering is remote you will see “Remote query” operator instead of remote scan.
 
How to fix it?
DynamicParameters and NestedQueries in the provider you are using should play a role here (Object exploreràServer objects à Linked servers  àProviders à Choose the provider you are using in linked server (Ex: SQLOLEDB) and enable  DynamicParameters and NestedQueries ). DynamicParameters setting should enable providers to support parameterized queries. If you enable it probably “remote scan” would switch to “remote query” and filtering will be happen on remote server instead of fetching the data locally and filtering.

JOB does not exist in the job cache

Error:
Job  does not exist in the job cache: attempting to re-acquire it from the server
Warning,[156] Job does not exist in the job cache
Error 22022 JOB does not exist in the job cache

Cause 1:
1. Expand the SQL Server SSMS
2. select the SQLAGENT
3. Right click and select properties
4.Check the properties in the connection TAB at SQL Server.

Check if SQL Server alias is pointing to different server. If yes change it back to default and restart SQL Server

Cause 2:
In correct MSX/TSX configuration or MSX/TSX

Cleaned up system tables related to MSX-TSX in MSDB and reconfigure MSX/TSX configuration and jobs.
systargetservergroupmembers
systargetservergroups
systargetservers
You can run ‘sp_msx_enlist’ at target server and check the output error if there has some error happened.

Cause 3:
Disable encryption.certificate validation are enabled for connections between master servers and target servers by default.
   a) “Start”->”run”->type “regedit” at ‘GSHJRQA’ server.
   b) Navigate to \HKEY_LOCAL_MACHINE\SOFTWARE\Microsoft\Microsoft SQL Server\\SQLServerAgent\MsxEncryptChannelOptions(REG_DWORD)
   c) Change “MsxEncryptChannelOptions” value from 2 to 0.

1398(There is a time and/or date difference between the client and server.) Backup

Backup database failes with error

“Write on “\\\tes.bak” failed: 1398(There is a time and/or date difference between the client and server.)

Resolution

You will get this error if Kerberos ticket in the SQL Server is expired, restart SQL Server. Also check if Windows Time service is running

Deferred update instead of direct

Although we dont update the column of unique constraint we might verywell end up with defererred update if you dont pass all the coulumns of PK contraint in where clause of the update query. We have to review all update statements to check if all columns of unique constraint is passed in where clause.

 Assume you fire below query on table with below constraint

 CONSTRAINT [PK_] PRIMARY KEY CLUSTERED
(
 c1  ASC,
 c2 ASC
 )

update table xx set xx=1 where pk1=1 and xx2=2

It is possible that multiple rows will be returned by the where clause in the update,hence breaks the requirements for a direct update (it is considered to be a multirow update because of the where clause)
Althought you did not update PK columns ,your search argument did not specify value for all the columns used to create index ,so you might end with deferred update

CACHESTORE_SQLCP will increase when you run backup

CACHESTORE_SQLCP increases continuously when we run the backup.
When you run the database/Tlog backup very frequently or for the databases with large number of files/file groups CACHESTORE_SQLCP increases
We can identify the issue by using below queries

Select text,a.*from sys.dm_exec_cached_plans a cross apply sys.dm_exec_sql_text(plan_handle)  order by size_in_bytes desc
Go

Select p.plan_handle,CONVERT (varchar, GETDATE(), 126) AS runtime, LEFT (p.cacheobjtype + ' (' + p.objtype + ')', 35) AS cacheobjtype
,p.usecounts, p.size_in_bytes / 1024 AS size_in_kb, stat.total_worker_time/1000 AS tot_cpu_ms,
stat.total_elapsed_time/1000 AS tot_duration_ms, stat.total_physical_reads, stat.total_logical_writes, stat.total_logical_reads,
LEFT (CASE WHEN pa.value=32767 THEN 'ResourceDb' ELSE ISNULL (DB_NAME (CONVERT (sysname, pa.value)),
CONVERT (sysname,pa.value))END, 40) AS dbname,sql.objectid, CONVERT (nvarchar(50),
CASE WHEN sql.objectid IS NULL THEN NULL ELSE REPLACE (REPLACE (sql.[text],CHAR(13), ' '), CHAR(10), '')END) AS procname,
REPLACE (REPLACE (SUBSTRING (sql.[text], stat.statement_start_offset/2 + 1, CASE WHEN stat.statement_end_offset = -1
THEN LEN (CONVERT(nvarchar(max), sql.[text]))
ELSE stat.statement_end_offset/2 - stat.statement_start_offset/2 + 1 END), CHAR(13), ' '), CHAR(10), ' ') AS stmt_text
FROM sys.dm_exec_cached_plans p OUTER APPLY sys.dm_exec_plan_attributes (p.plan_handle) pa INNER JOIN sys.dm_exec_query_stats stat
ON p.plan_handle = stat.plan_handle OUTER APPLY sys.dm_exec_sql_text (p.plan_handle) AS sql
WHERE pa.attribute = 'dbid' ORDER BY p.plan_handle DESC

Go

 
Resolution

SQL Server 2008
There is a fix for this issue in SQL server 2008 http://support.microsoft.com/kb/961323

SQL Server2005
There is no Fix for SQL Server 2005. You can follow some workarounds
Since all the plans (problematic) are created for MSDB. You can use dbcc flushprocindb(4) —  to flush the plans of msdb without touching the plans of other databases (4 is database id of MSDB) .
You can add a new step to backup job created by maintenance plan to run dbcc flushprocindb(4) every time backup completes. So the plans created in MSDB will be flushed immediately after the backup.

dbcc dbredindex/Alter index (or) update stats which should run first

dbcc dbredindex/Alter index (or) update stats which should run first?

Statistics created manually or by auto create stats will not be updated by ALTER INDEX ALL ON table.

If you run dbcc dbredindex on a table , it will update stats on index indx with 100% sampling, but the stats created by auto create stats and manually created stats are updated with default sampling percentage.

Now choose your self.


Same value for min server memory and max server memory in SQL server

SQL Server memory management is designed to dynamically adjust the committed memory based on the amount of available memory on the system.

SQL Server uses CreateMemoryResourceNotification to create a memory resource notification object and SQL Server Resource monitor threads calls QueryMemoryResourceNotification every time it runs to identify if there is any notification. If a low memory notification comes from Windows, SQL Server scales down its memory usage.

How much it scales down?
Till “Min server memory”  (If there is continous memory pressure on the system).
What happens when you set Max server memory and min server memory to same value?
Ans:SQL Server will never scale down its memory usage even when there is memory pressure system wide (Lowphysicalmemory notification  set at system level)

What are the affects?
Ans:If LPM is not enabled SQL Server’s working set will be paged. If LPM is enabled system will starve for memory  and non-bpool will be paged.

Refer http://mssqlwiki.com/2012/06/27/a-significant-part-of-sql-server-process-memory-has-been-paged-out/ for more details.

Cap the SQL Server MAX Server Memory after considering the memory required by other applications, Operating system, Drivers , SQL Server Non- Bpool allocations etc. Make sure you have adequate available physical memory even when the system is under heavy load.

Make sure you have all the fixes for working set trim refer http://mssqlwiki.com/sqlwiki/sql-performance/windows-2008-and-windows-2008-r2-known-issues-related-to-working-set-memory/

UPDATE STATISTICS WITH SAMPLE take longer then FULLSCAN

UPDATE STATISTICS WITH SAMPLE take longer then FULLSCAN and consumes more tempdb

Recently there was a question in MSDN forum about time and tempdb taken by update statistics with full scan and sampling.
http://social.msdn.microsoft.com/Forums/en/sqldatabaseengine/thread/eee70106-94aa-4140-82bf-654352f82d8f
Question was why full scan completes faster than sampling

I was trying to reproduce this behavior in one of my lab server.

1.When I was updating the statistics with n% sampling for the Clustered Index on Table(Which had clustered and non-clustered index ), SQL Server choses a non-clustered index to do the scan. Here the data scanned/fetched was in the order of the non-clustered index keys. Hence we need to SORT them once based on the clustered index keys to generate the statistics. Sort was consuming time and we also used tempdb to create the worktables.

2 .On the other side when I was using update stats with fullscan SQL Server chooses a “clustered index scan” to do the scan. Since the data was already sorted in clustered index, sort was avoided and update stats completed faster.

Why optimizer used non-clustered index to do the scan when I was using n% sampling ?
As we are using a non-clustered index to scan the rows, we effectively get lot lesser rows into the memory from disk when compared with using a clustered index to scan the rows. The decision about which index to use was cost based. As we know SQL Server is a cost based optimizer it chooses the index that can provide the results with lesser subtree cost.
If I wouldn’t have got that non-clustered index , then sampling might have run faster.
There is no straight answer “It depends“.You have to look at the plan of update stats and troubleshoot/Identify the cause like you do for any other slow queries.