Integration Services server cannot be configured because there are active operations. Wait until there are no active operations, and then try to configure the server again

SSISDB.internal.cleanup_server_log will fail with

{

Integration Services server cannot be configured because there are active operations. Wait until there are no active operations, and then try to configure the server again.

}

SSISDB.internal.cleanup_server_log will fail with below error

{

Integration Services server cannot be configured because there are active operations. Wait until there are no active operations, and then try to configure the server again.

}

When you have pending or active operations in [internal].[operations] table.

Resolution

To resolve the issue identify all the operations with status 2 (running) or status 5 (pending) from Internal.operations table and then stop the running operations (SSMS->Integration Services CatalogsàSSISDBàRight click active operations). If there are any rows with status 5 they might be orphan records so check when they are started and delete them if they are orphan. You can use below query to identify running and pending operations.

SELECT * FROM [internal].[operations] where status=2 or status=5

Once all the rows with status 2 or 5 is removed/updated we can run SSISDB.internal.cleanup_server_log

SQL Server setup fails with “Failed to retrieve data for this request”


SQL Server setup would fail with below error in message box “Failed to retrieve data for this request”

{

TITLE: SQL Server Setup failure.

——————————

SQL Server Setup has encountered the following error:

Failed to retrieve data for this request..

For help, click: http://go.microsoft.com/fwlink?LinkID=20476&ProdName=Microsoft%20SQL%20Server&EvtSrc=setup.rll&EvtID=50000&EvtType=0xE8A0C283%25400xAC7B1A58%25401233%254053

——————————

BUTTONS:

OK

}

In Summary.txt you will notice error similar to one below

Overall summary:

Final result: Failed: see details below

Exit code (Decimal): -2146233088

Exit facility code: 19

Exit error code: 5376

Exit message: Failed to retrieve data for this request.

Start time: 2015-02-19 19:48:58

End time: 2015-02-19 19:50:47

Requested action: Install

Exception help link: http://go.microsoft.com/fwlink?LinkId=20476&ProdName=Microsoft+SQL+Server&EvtSrc=setup.rll&EvtID=50000&ProdVer=12.0.2342.0&EvtType=0xE8A0C283%400xAC7B1A58%401233%4053&EvtType=0xE8A0C283%400xAC7B1A58%401233%4053

Exception summary:

The following is an exception stack listing the exceptions in outermost to innermost order

Inner exceptions are being indented

Exception type: Microsoft.SqlServer.Management.Sdk.Sfc.EnumeratorException

Message:

Failed to retrieve data for this request.

HResult : 0x80131500

Data:

HelpLink.ProdName = Microsoft SQL Server

HelpLink.BaseHelpUrl = http://go.microsoft.com/fwlink

HelpLink.LinkId = 20476

HelpLink.EvtType = 0xE8A0C283@0xAC7B1A58@1233@53

DisableWatson = true

Stack:

at Microsoft.SqlServer.Management.Sdk.Sfc.Enumerator.Process(Object connectionInfo, Request request)

at Microsoft.SqlServer.Chainer.Infrastructure.SqlDiscoveryDatastoreInterface.ProcessDTbl(DataTable dt, Int32 level)

at Microsoft.SqlServer.Chainer.Infrastructure.SqlDiscoveryDatastoreInterface.CollectSqlDiscoveryData(String machineName)

at Microsoft.SqlServer.Chainer.Infrastructure.SqlDiscoveryDatastoreInterface.CollectDiscoveryData(String machineName)

at Microsoft.SqlServer.Chainer.Infrastructure.SqlDiscoveryDatastoreInterface.LoadData(IEnumerable`1 machineNames, String discoveryDocRootPath, String clusterDiscoveryDocRootPath)

at Microsoft.SqlServer.Configuration.SetupExtension.RunDiscoveryAction.ExecuteAction(String actionId)

at Microsoft.SqlServer.Chainer.Infrastructure.Action.Execute(String actionId, TextWriter errorStream)

at Microsoft.SqlServer.Setup.Chainer.Workflow.ActionInvocation.<>c__DisplayClasse.<ExecuteActionWithRetryHelper>b__b()

at Microsoft.SqlServer.Setup.Chainer.Workflow.ActionInvocation.ExecuteActionHelper(ActionWorker workerDelegate)

Inner exception type: Microsoft.SqlServer.Configuration.Sco.SqlRegistryException

Message:

The network path was not found.

HResult : 0x84d10035

FacilityCode : 1233 (4d1)

ErrorCode : 53 (0035)

Data:

WatsonData = Microsoft.SqlServer.Configuration.Sco.SqlRegistryException@Win32Error

Stack:

at Microsoft.SqlServer.Configuration.Sco.SqlRegistry.CreateBaseKey(ServiceContainer ctx, String machineName, IntPtr hKey, String keyName, RegistryAccess access, RegistryView view)

at Microsoft.SqlServer.Configuration.Sco.SqlRegistry.GetLocalMachine(ServiceContainer ctx, String machineName, RegistryAccess access, RegistryView view)

at Microsoft.SqlServer.Discovery.DiscoveryUtils.GetLocalMachineRootKey(ServiceContainer ctx, String machineName, RegistryView registryView)

at Microsoft.SqlServer.Discovery.DiscoveryUtils.GetLocalMachineSubKey(ServiceContainer ctx, String machineName, RegistryView regView, String regPath, RegistryAccess registryAccess)

at Microsoft.SqlServer.Discovery.DiscoveryEnumObject.GetSql2kMsiInstanceListInHive(String machineName, RegistryView regView)

at Microsoft.SqlServer.Discovery.DiscoveryEnumObject.LoadSql2kInstanceList(String machineName)

at Microsoft.SqlServer.Discovery.Product.GetData(EnumResult erParent)

at Microsoft.SqlServer.Management.Sdk.Sfc.Environment.GetData()

at Microsoft.SqlServer.Management.Sdk.Sfc.Environment.GetData(Request req, Object ci)

at Microsoft.SqlServer.Management.Sdk.Sfc.Enumerator.GetData(Object connectionInfo, Request request)

at Microsoft.SqlServer.Management.Sdk.Sfc.Enumerator.Process(Object connectionInfo, Request request)

Watson error

Watson bucket data:

Bucket param 1: SQL Server 2014@RTM@

Bucket param 2: 0x6785B09D

Bucket param 3: 0xE8A0C283

Bucket param 4: 0x74E34741

Bucket param 5: 0xAC7B1A58@1233@53

Bucket param 6: RunRemoteDiscoveryAction

Bucket param 7:

Bucket param 8:

Bucket param 9: 0xD195CE25

Bucket param 10:

From detail.txt

(01) 2015-02-19 19:49:25 Slp: Discovery on nodename failed due to exception

(01) 2015-02-19 19:49:25 Slp: Microsoft.SqlServer.Management.Sdk.Sfc.EnumeratorException: Failed to retrieve data for this request. —> Microsoft.SqlServer.Configuration.Sco.SqlRegistryException: The network path was not found.

at Microsoft.SqlServer.Configuration.Sco.SqlRegistry.CreateBaseKey(ServiceContainer ctx, String machineName, IntPtr hKey, String keyName, RegistryAccess access, RegistryView view)

at Microsoft.SqlServer.Configuration.Sco.SqlRegistry.GetLocalMachine(ServiceContainer ctx, String machineName, RegistryAccess access, RegistryView view)

at Microsoft.SqlServer.Discovery.DiscoveryUtils.GetLocalMachineRootKey(ServiceContainer ctx, String machineName, RegistryView registryView)

at Microsoft.SqlServer.Discovery.DiscoveryUtils.GetLocalMachineSubKey(ServiceContainer ctx, String machineName, RegistryView regView, String regPath, RegistryAccess registryAccess)

at Microsoft.SqlServer.Discovery.DiscoveryEnumObject.GetSql2kMsiInstanceListInHive(String machineName, RegistryView regView)

at Microsoft.SqlServer.Discovery.DiscoveryEnumObject.LoadSql2kInstanceList(String machineName)

at Microsoft.SqlServer.Discovery.Product.GetData(EnumResult erParent)

at Microsoft.SqlServer.Management.Sdk.Sfc.Environment.GetData()

at Microsoft.SqlServer.Management.Sdk.Sfc.Environment.GetData(Request req, Object ci)

at Microsoft.SqlServer.Management.Sdk.Sfc.Enumerator.GetData(Object connectionInfo, Request request)

at Microsoft.SqlServer.Management.Sdk.Sfc.Enumerator.Process(Object connectionInfo, Request request)

— End of inner exception stack trace —

at Microsoft.SqlServer.Management.Sdk.Sfc.Enumerator.Process(Object connectionInfo, Request request)


Resolution

1. Check the connectivity between node from which you are installing SQL Server to other nodes. (\\Othernodes should work when you are installing SQL on box which is part of windows cluster regardless of SQL Cluster).
The selected Subscriber does not satisfy the minimum version compatibility level of the selected publication.

When you configure replication subscriber and if your subscriber instance is in higher version than publisher instance you might get below error

Example when you configuring subscriber on SQL Server 2014 instance for SQL Server 2012 Publisher  using SQL Server 2012 SSMS you would get below error.

Error:

The selected Subscriber does not satisfy the minimum version compatibility level of the selected publication.

Resolution:

Create subscriber using higher version SSMS (SSMS has to be subscriber version or higher) or create subscriber using TSQL.

Sp_rename fails : Either the parameter @objname is ambiguous or the claimed @objtype (object) is wrong.

Sp_rename fails with

Msg 15248, Level 11, State 1, Procedure sp_rename, Line 357

Either the parameter @objname is ambiguous or the claimed @objtype (object) is wrong.

You would get this error if you have ‘DOT’ in between your constraint name. SP_rename fails because object_id(ContraintnamewithDOT) returns NULL for constraint objects with DOT (.) in their name.

Solution

Drop and recreate the constraint without DOT (.) in name.

SSIS package fails with out of memory errors

You might get below out of memory errors when you run SSIS packages 

Errors

A buffer failed while allocating n bytes. The system reports n percent memory load. There are n bytes of physical memory with n bytes free.

There are 2147352576 bytes of virtual memory with 44814336 bytes free. The paging file has 687069143034 bytes with 35348451328 bytes free.

A buffer failed while allocating 63160 bytes. The attempt to add a row to the Data Flow task buffer failed with error code 0x8007000E. 

SSIS Error Code DTS_E_PRIMEOUTPUTFAILED.  The PrimeOutput method on component “Read Results” (975) returned error code 0xC02020C4.  The component returned a failure code when the pipeline engine called PrimeOutput(). The meaning of the failure code is defined by the component, but the error is fatal and the pipeline stopped executing.  There may be error messages posted before this with more information about the failure. 

The system reports 2 percent memory load. There are 206147428352 bytes of physical memory with 24692375552 bytes free. There are 8796092891136 bytes of virtual memory with 8713333325824 bytes free. The paging file has 205966053376 bytes with 15835136 bytes free.

Executed as user: Domain\Password . …9.00.4035.00 for 32-bit  Copyright (C) Microsoft Corp 1984-2005. All rights reserved.    Started:  6:06:21 AM  Error:     Code: 0xC0047012     Source: Load Daily Run Piece DTS.Pipeline     Description: A buffer failed while allocating 6356480 bytes.  End Error  Error: 2009-12-29 06:19:41.56     Code: 0xC0047011     Source: Load Daily Run Piece DTS.Pipeline     Description: The system reports 82 percent memory load. There are 4294656000 bytes of physical memory with 756637696 bytes free. There are 2147352576 bytes of virtual memory with 399495168 bytes free. The paging file has 8418062336 bytes with 5051555840 bytes free.

The system reports 24 percent memory load. There are 68716240896 bytes of physical memory with 51754737664 bytes free. There are 2147352576 bytes of virtual memory with 146911232 bytes free. The paging file has 137430540288 bytes with 120562003968 bytes free.

Below are options you can use to solve the above errors

1. Check if the Page file for the system is configured properly, you might get this error if there is no page file or if page file is very small

2. Change the lookup cache mode from Full to Partial or no cache mode.

3. Migrate to 64-Bit SSIS if you are in 32-BIT. Remember you have to migrate all the drivers and providers used in connections. If you are in 64 BIT system and getting above errors while executing packages from BIDS then check if you have set package to run in 64bit run time ( Run64bitruntime = True in  Integration services project properties page).

4.  Divide the package in to multiple child packages (Execute package task –> ExecuteOutOfProcess =True)

5. Tweak DefaultBufferMaxRows and DefaultBufferMaxSize size.

Cannot bring the Windows Server Failover Clustering (WSFC) resource (ID ‘ ‘) online (Error code 5018).

Problem description

You might get below error when configuring Always on availability group If the cluster services startup account is not part of SQL Server logins.

Error:

TITLE: Microsoft SQL Server Management Studio

——————————

Creating availability group resulted in an error. (Microsoft.SqlServer.Management.HadrTasks)

——————————

ADDITIONAL INFORMATION:

Create failed for Availability Group ‘KK_AG’.  (Microsoft.SqlServer.Smo)

For help, click: http://go.microsoft.com/fwlink?ProdName=Microsoft+SQL+Server&ProdVer=11.0.3373.0+((SQL11_SP1_QFE-CU).130629-2102+)&EvtSrc=Microsoft.SqlServer.Management.Smo.ExceptionTemplates.FailedOperationExceptionText&EvtID=Create+AvailabilityGroup&LinkId=20476

——————————

An exception occurred while executing a Transact-SQL statement or batch. (Microsoft.SqlServer.ConnectionInfo)

——————————

Cannot bring the Windows Server Failover Clustering (WSFC) resource (ID ’74eaaa74-4e7d-470a-96b4-29459cb4516e’) online (Error code 5018).  The WSFC service may not be running or may not be accessible in its current state, or the WSFC resource may not be in a state that could accept the request.  For information about this error code, see “System Error Codes” in the Windows Development documentation.

Failed to designate the local availability replica of availability group ‘KK_AG’ as the primary replica.  The operation encountered SQL Server error 41066 and has been terminated.  Check the preceding error and the SQL Server error log for more details about the error and corrective actions.

Failed to create availability group ‘KK_AG’.  The operation encountered SQL Server error 41160 and has been rolled back.  Check the SQL Server error log for more details.  When the cause of the error has been resolved, retry CREATE AVAILABILITY GROUP command. (Microsoft SQL Server, Error: 41066)

For help, click: http://go.microsoft.com/fwlink?ProdName=Microsoft%20SQL%20Server&ProdVer=11.00.3373&EvtSrc=MSSQLServer&EvtID=41066&LinkId=20476


You would also see errors similar to one  below when you configure always on availability group using scripts.


Msg 41131, Level 16, State 0, Line 1

Failed to bring availability group ‘TDE_AG’ online.  The operation timed out. Verify that the local Windows Server Failover Clustering (WSFC) node is online. Then verify that the availability group resource exists in the WSFC cluster. If the problem persists, you might need to drop the availability group and create it again.

Msg 41152, Level 16, State 2, Line 1

Failed to create availability group ‘TDE_AG’.  The operation encountered SQL Server error 41131 and has been rolled back.  Check the SQL Server error log for more details.  When the cause of the error has been resolved, retry CREATE AVAILABILITY GROUP command.

Resolution:

Add start up account of cluster service to SQL Server login and grant sysadmin role (Start up account of cluster service will be nt authority\system by default).

SQL Server cluster installation checklist

List of checks you may need to perform before you install SQL Server Cluster.

1. Verify your system meets the minimum requirements
910228 SQL Server 2005 Readme and installation requirements
http://support.microsoft.com/default.aspx?scid=kb;EN-US;910228
907284 Changes to the readme file for SQL Server 2005
http://support.microsoft.com/default.aspx?scid=kb;EN-US;907284
327518 The Microsoft support policy for a SQL Server Failover cluster – Please note that ONLY Microsoft Failover Clusters are supported.
http://support.microsoft.com/default.aspx?scid=kb;EN-US;327518
SQL Server 2008  Before Installing Failover Clustering
http://download.microsoft.com/download/4/5/3/453739ed-cb74-46b1-b7af-f157ee71db20/SQL2008Readme.htm.
http://msdn.microsoft.com/en-us/library/ms189910%28v=SQL.100%29.aspx

2. Log on as an Administrator.
SQL Server 2005/2008:  Log on to the cluster node as a domain administrator that is also local administrator on all nodes, but not necessarily an account that is to be used as a service startup account for the SQL Server services.

Pre create user groups in active directory for different SQL Server 2005/2008 services(SQL,Agent,FT).SQL Server setup will add the service accounts of SQL Services to this groups during setup. You have to pre create unique group name for each Service in AD and enter it when prompted during SQL Server2005/2008 Cluster setup.
SQL Server Setup grants the following Windows NT rights and privileges to the Group you enter during setup (If you can not run the setup as domain administrator then add the service logon accounts to the security groups created in AD before the setup).
For SQL Server group
Log on as a service (SeServiceLogonRight)
Act as part of the operating system (SeTcbPrivilege) (only on Windows 2000)
Log on as a batch job (SeBatchLogonRight)
Replace a process-level token (SeAssignPrimaryTokenPrivilege)
Bypass traverse checking (SeChangeNotifyPrivilege)
Adjust memory quotas for a process (SeIncreaseQuotaPrivilege)
Permission to start SQL Server Active Directory Helper
Permission to start SQL Writer
and many more
For  SQL Server Agent group
Log on as a service (SeServiceLogonRight)
Act as part of the operating system (SeTcbPrivilege) (only on Windows 2000)
Log on as a batch job (SeBatchLogonRight)
Replace a process-level token (SeAssignPrimaryTokenPrivilege)
Bypass traverse checking (SeChangeNotifyPrivilege)
Adjust memory quotas for a process (SeIncreaseQuotaPrivilege)

3. There should not be a pending Reboot requirement

Check pending Reboot requirement in following registry:
HKLM\SYSTEM\CurrentControlSet\Control\Session Manager
In the right-hand pane, is there a value of PendingFileRenameOperations?  If so, is it empty?
If empty close the registry editor.  If not empty, reboot the machine prior to running setup.  After logging in, re-check this registry value to make sure it is empty.

4. Verify Cluster “Heartbeat”
For a Failover Clustered Instance installation on Windows 2003 or earlier, verify cluster networking was setup per:
258750 Recommended private “Heartbeat” configuration on a cluster server
http://support.microsoft.com/?id=258750
NOTE: This needs to be followed explicitly in regards to the binding orders and your heartbeat adapter’s configuration.

5. Verify the TCP\IP Advanced DNS settings are identical on the “Public” network adapters between all Failover cluster nodes

6. Stop All Non- Microsoft Services  Excluding services required by SAN or network adapters online

7. Make sure  below services are running on all node’s
Cryptographic Services <====This must be running on all nodes.
DNS Client
Event Log
Remote Registry Service <====This must be running on all nodes.
Task Scheduler
Windows Management Instrumentation Driver Extensions
Windows Management Instrumentation

8.  Flush Cached DNS Entries
Flush the DSN cache.

Ipconfig /flushdns
then… Referesh te netbios name registered
Nbtstat –RR

9. Verify Logon Server
Open a command prompt on each node and enter the command:

set logonserver

Verify if logon server is same on all nodes.

10. Verify Admin Shares
IPC$
C$
Admin$
DriveLetter$
DriveLetter = Disk in which you have setup files.

Use the “Shared Folders” MMC snap-in  to verify the existing Administrative shares.

11. Only One RDP Session

Make sure no one else is logged in to any of the nodes. There should be only one logon session in active node which we use for setup.
12 . Make sure we are able to failover SQL Server groups to all nodes.

13. Cluster MSDTC
Create MSDTC resource.

14. If windows2008+ Grant  “Create Computer Objects” permission for  the computer object created for the cluster  (Computer Name object(CNO)).

http://mssqlwiki.com/2009/03/26/installation-of-sqlserver20052008-fails-on-windows2008-cluster/

15. For Windows 2008, see How to configure DTC for SQL Server in a Windows 2008 cluster http://blogs.msdn.com/cindygross/archive/2009/02/22/how-to-configure-dtc-for-sql-server-in-a-windows-2008-cluster.aspx
Use the following KB article to Cluster MSDTC if not already clustered on Windows 2003:
301600 How to configure Microsoft Distributed Transaction Coordinator on a Windows Server 2003 cluster
http://support.microsoft.com/default.aspx?scid=kb;EN-US;301600

16. Grant Read SPN and write SPN permission for startup account of SQL Server (or) Security group provided during installation for SQL Service startup account.

17) Verify Dependencies http://support.microsoft.com/default.aspx?scid=kb;EN-US;835185

PREEMPTIVE_OS_AUTHORIZATIONOPS waits in SQL Server

SQL Server threads which are controlled by SOS (SQL Server operating system) are Non preemptive but at times they switch preemptive when they can’t obey the rules of SOS. Some common places when SOS thread is switched preemptive are when we call extended proc’s, few Windows API etc.


Let us assume you use “execute as user x” in your job, SQL Server calls Windows functions like LookupAccountName  to get the credential of user. Windows functions interacts with AD services to get the credentials of account and return the info to the caller in SQL Server process and then SQL Server would build the logintoken. If there is a delay in AD and if it takes long time to respond to the windows function calls other threads in the same scheduler would get blocked so SQL Server thread would switch preemptive (Doesn’t follow SOS rules) before  making these  function  calls. PREEMPTIVE_OS_AUTHORIZATIONOPS wait type would occur when a thread is waiting on such windows functions (security) to return, So first thing which would have to do is to fix the performance of AD calls.


To narrow down and prove that this issue occurs because of Active directory performance. Login to SQL server using the startup account of SQL Server and execute below query when you notice PREEMPTIVE_OS_AUTHORIZATIONOPS wait type and compare the times printed. It will give you the time it takes for SQL Server to complete the AD calls.


create procedure PREEMPTIVEOSAUTHORIZATIONOPS  with execute as self

as

set nocount on

select CONVERT(varchar, getdate(), 126) PREEMPTIVEOSAUTHORIZATIONOPS

go

print convert(varchar, getdate(), 126)

exec dbo.PREEMPTIVEOSAUTHORIZATIONOPS;    

print convert(varchar, getdate(), 126)

go

SQL Server Backup compression

How to do Backup compression in SQL Server?

The backup compression  option determines whether SQL Server creates compressed or uncompressed backups .Backup compression option is off by default in SQL Server.The default behavior  can be modified by sp_configure option “backup compression default” .

Syntax:

USE master;
GO
EXEC sp_configure ‘backup compression default’, ‘1’;
RECONFIGURE WITH OVERRIDE;

To override the backup compression:

You can change the backup compression behavior for an individual backup by using WITH NO_COMPRESSION or WITH COMPRESSION in a BACKUP statement. We cannot take compressed and non-compressed backups on the same file. If we take COMPRESSION  backup on a file were  already non-compressed backup has taken,error will be shown.So we have to use different files for compressed and uncompressed backup.

Example to take backup for AdventureWorks with NO_COMPRESSION:

BACKUP DATABASE [AdventureWorks] TO  DISK = N’C:\Program Files\Microsoft SQL Server\MSSQL11.MSSQLSERVER\MSSQL\Backup\uncompressed.bak’ WITH NO_COMPRESSION
GO

Example to take backup for AdventureWorks WITH COMPRESSION:

BACKUP DATABASE [AdventureWorks] TO  DISK = N’C:\Program Files\Microsoft SQL Server\MSSQL11.MSSQLSERVER\MSSQL\Backup\compressed.bak’ WITH COMPRESSION
GO

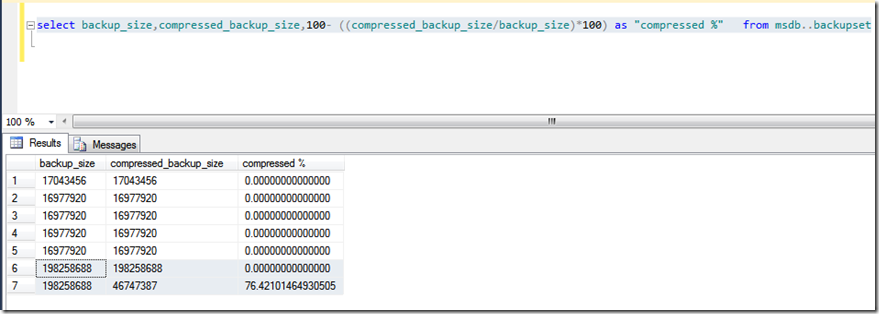
To calculate the compression ratio of a backup:

After taking backup with compression and without compression the backup_size can be compared to see the difference.

Syntax:

select backup_size,compressed_backup_size,100- ((compressed_backup_size/backup_size)*100) as “compressed %”   from msdb..backupset

 image

Types of isolation levels in SQL Server

The ISO standard defines the following isolation levels in SQL Server Database Engine:  

Microsoft SQL Server supports these transaction isolation levels:

Read Committed

SQL Server acquires a share lock while reading a row into a cursor but frees the lock immediately after reading the row. Because shared lock requests are blocked by an exclusive lock, a cursor is prevented from reading a row that another task has updated but not yet committed. Read committed is the default isolation level setting for both SQL Server and ODBC.

Read Uncommitted

SQL Server requests no locks while reading a row into a cursor and honors no exclusive locks. Cursors can be populated with values that have already been updated but not yet committed. The user is bypassing all of the locking transaction control mechanisms in SQL Server.

Repeatable Read 

SQL Server requests a shared lock on each row as it is read into the cursor as in READ COMMITTED, but if the cursor is opened within a transaction, the shared locks are held until the end of the transaction instead of being freed after the row is read. So phantom rows are This has the same effect as specifying HOLDLOCK on a SELECT statement.

(Phantom read:Phantom reads occurs when an insert or delete action is performed against a row that is being read by a transaction.The second  transaction read shows a row that did not exist in the original read as the result of an insertion by a different transaction or due to deletion operation some rows  doesn’t appear)

Serializable

     In serializable read phantom reads are not allowed because while the first transaction is in progress other transaction wont execute.

Snapshot

SQL Server requests no locks while reading a row into a cursor and honors no exclusive locks. Cursor is populated with the values as of the time when the transaction first started. Scroll locks are still requested regardless of use of snapshot isolation.


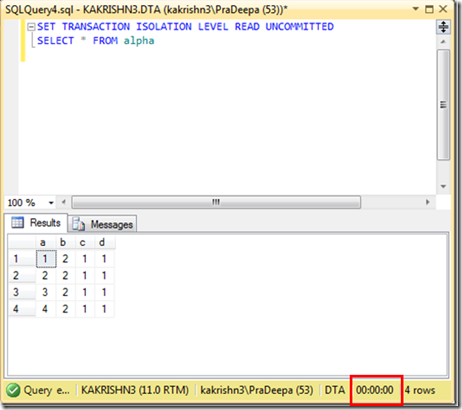
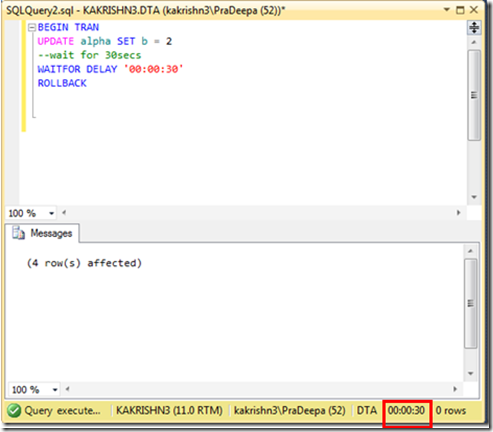
Read uncommitted example: Uncommitted Read allows your transaction to read any data that is currently on a data page, whether that has been committed or not. For example,another user might have a transaction in progress that has updated data, and even though it’s holding exclusive locks on the data, your transaction can read it anyway.

image

If we execute the select query before the update transaction gets committed,it will not wait for the update transaction to commits.Query will be executed immediately without any time lapse.

image

Read Committed example

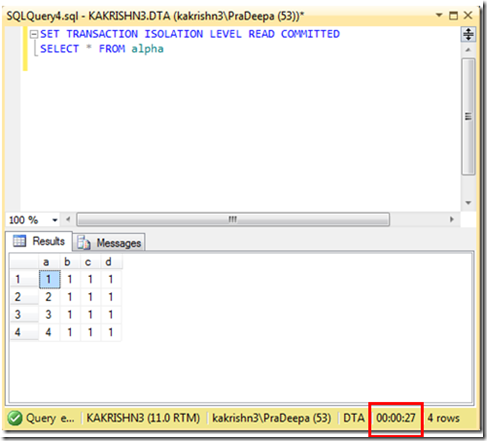
Read committed allows your transaction to read only if the data is committed.Read Committed operation never reads data that another application has changed but not yet committed.

image

If we execute the select query before the update transaction gets committed,it will wait till the update transaction gets committed.

image

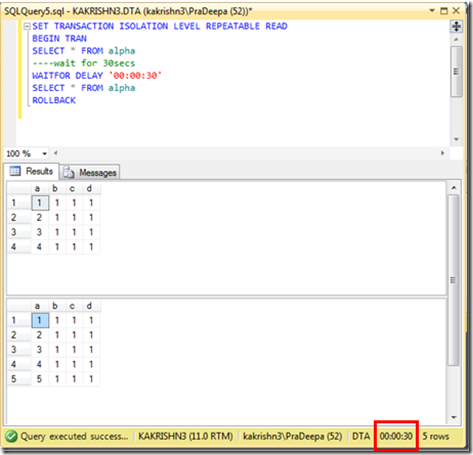
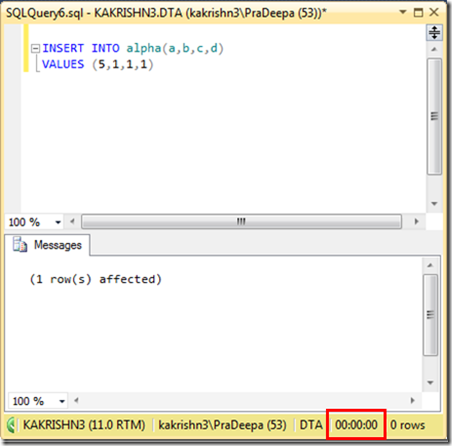
Repeatable Read example :In Repeatable Read issuing the same query twice within a transaction will not make any changes to data values made by another user’s transaction.Repeatable Read allows phantom reads(Data getting changed in current transaction by other transactions is called Phantom Reads).So phantom rows will appear.

image

While the transaction(first query) is in progress,repeatable read allows another transaction(second query) to execute.It means it allow phantom reads.So second transaction(second query),need not wait till first transaction(first query) completes.Here values will be added before first query completes.

image

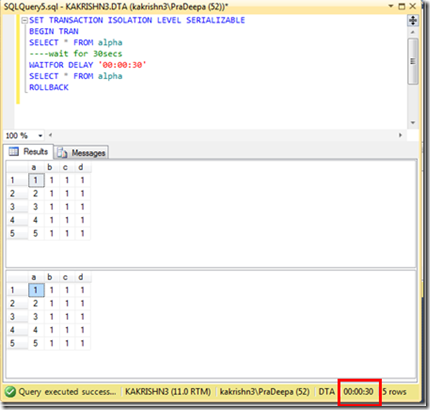
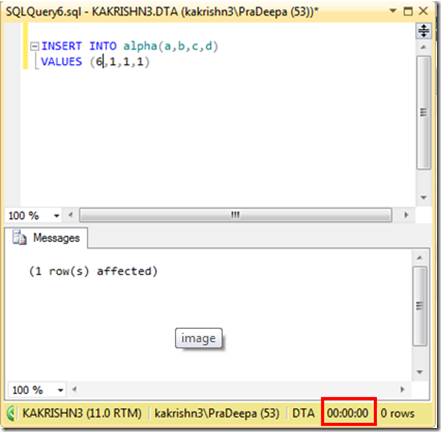
Serializable example : The Serializable isolation level adds to the properties of Repeatable Read by ensuring that if a query is reissued, rows will not have been added in the table. In other words, phantoms will not appear if the same query is issued twice within a transaction.

image

While the transaction(first query) is in progress,serializable read does not  allow another transaction(second query),It means it don’t allow phantom reads.So second transaction(second query), must wait till first transaction(first query) completes.Here values will be added only after first query completes.

image

snapshot example : To use the snapshot isolation level you need to enable it on the database by running the following command

ALTER DATABASE DBname
SET ALLOW_SNAPSHOT_ISOLATION ON

SQL Server database snapshot

What is the use of SQL Server database snapshot and how to create SQL Server database snapshot?

Database snapshots are available only in SQL Server 2005 Enterprise Edition and later versions. All recovery models support database snapshots.

A database snapshot is a read-only, static view of the source database.Multiple snapshots can exist on a source database and always reside on the same server instance as the database. Each database snapshot is transactionally consistent with the source database as of the moment of the snapshot’s creation.A snapshot persists until it is explicitly dropped by the database owner.

Snapshots can be used for reporting purposes.In the event of a user error on a source database, you can revert the source database to the state it was in when the snapshot was created. Data loss is confined to updates to the database since the snapshot’s creation.

Creating a series of snapshots over time captures sequential snapshots of the source database. Each snapshot exist until it is dropped.Each snapshot will continue to grow as  pages in original database are updated, you may want to conserve disk space by deleting an older snapshot after creating a new snapshot.

Steps to create database snapshot in SQL Server:

1.Create a new database or use existing database to create the database snapshots.

Syntax:

USE master
GO
— Create database
CREATE DATABASE test
GO
USE test
GO

2.Create table  and Insert values into table.

Syntax:

–create a Table
CREATE TABLE test1 (a INT, b INT,c INT)
—Insert values
declare @a nchar(10)
set @a=1
while (@a<5)
begin
insert into test1 values (@a,’1′,’1′)
set @a=@a+1
end

3.Create a snapshot  for a source database.

Syntax:

— Create Snapshot Database
CREATE DATABASE Snapshottest ON
(Name =’test’,
FileName=’C:\Program Files\Microsoft SQL Server\MSSQL11.MSSQLSERVER\MSSQL\DATA\testsnap.ss’)
AS SNAPSHOT OF test;
GO

image

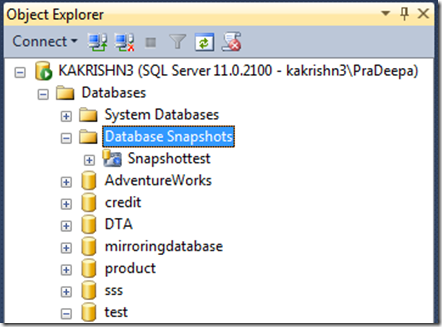
Snapshottest database is created successfully.

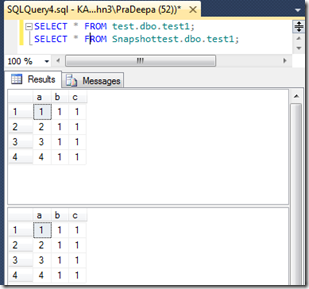
4.Now let us view both the source database and snapshot database.

Syntax:

SELECT * FROM test.dbo.test1;
Go
SELECT * FROM Snapshottest.dbo.test1;
Go

Data’s in tables of source and snapshot database are same.

 image

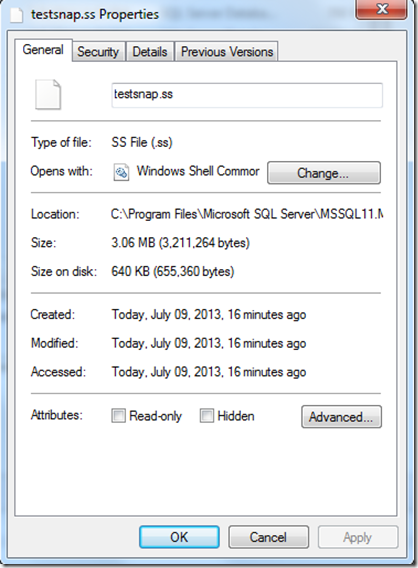
Size on disk  of the testsnap .ss could be viewed by opening its properties window.Let us note the  size on disk  of the source database.

image

5.Let us update existing rows in the table.

Syntax:

update test1 set a=0,b=0,c=0

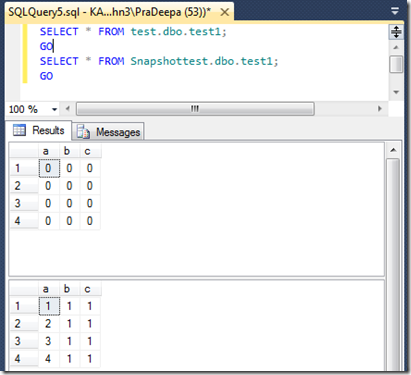
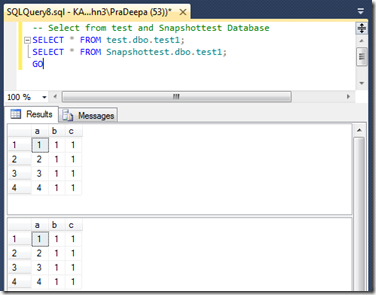
6.After updating rows ,let us view the source and snapshot database.The values are updated only in source database,not in snapshot database.Because snapshot database is consistent with the source database as of the moment of the snapshot’s creation.

Syntax:

— Select from test and Snapshottest Database
SELECT * FROM test.dbo.test1;
SELECT * FROM Snapshottest.dbo.test1;
GO

image 

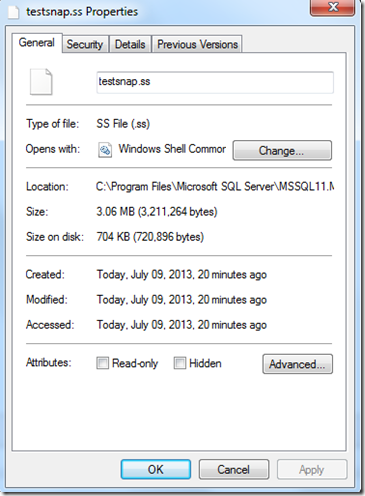
But size on disk is increased,It clearly shows that when we update data in Source database, it copies the old/existing data pages to Snapshot database. This is the reason why the size of the snapshot database is increasing while updating the source database.

image

7.We could revert the source database.Reverting overwrites updates made to the source database since the snapshot was created by copying the pages from the sparse files back into the source database.

Syntax:

— Restore old data from Snapshot Database
USE master
GO
RESTORE DATABASE test
FROM DATABASE_SNAPSHOT = ‘Snapshottest’;

8.View the data in the tables from the source and the snapshot database after the restore from snapshot.

Syntax:

SELECT * FROM test.dbo.test1;
Go
SELECT * FROM Snapshottest.dbo.test1;
Go

image

9.We drop the snapshot database like any other database using drop database command.

Syntax:

— drop snapshottest
DROP DATABASE [snapshottest];

10. We can also create database snapshot on mirror database for load balancing.

How to create table with filestream column and Insert data

How to create table with filestream column and Insert data?

Filestream data type in SQL Server  can be used to store images,documents,etc., in database.

In this blog I will explain how to create table with filestream data type.

Before creating table with filestream  column,we have to enable filestream feature in SQL Server configuration manager.Follow “How to enable and configure Filestream in SQL SERVER 2008 / 2012

Create a table and adding filestream data:

1.Create Filestream enabled database.

Syntax:

CREATE DATABASE test
ON
PRIMARY ( NAME = test1,
    FILENAME = ‘c:\data\testdat1.mdf’),
FILEGROUP FileStreamGroup1 CONTAINS FILESTREAM( NAME = test3,
    FILENAME = ‘c:\data\test1’)
LOG ON  ( NAME = testlog1,
    FILENAME = ‘c:\data\test1.ldf’)
GO

2.After you have a filestream enabled database.we now need to create a table and add data to it.

Syntax:

CREATE TABLE [dbo].[test](
   [ID] UNIQUEIDENTIFIER ROWGUIDCOL NOT NULL UNIQUE,
   [Number] VARCHAR(20),
   [Description] VARCHAR(50),
   [Image] VARBINARY(MAX) FILESTREAM NULL
)

3.Insert values into table. In below example I am inserting image file in to the table. 

Syntax:

DECLARE @img AS VARBINARY(MAX)
— Load the image data
SELECT @img = CAST(bulkcolumn AS VARBINARY(MAX))
      FROM OPENROWSET(Bulk  ‘C:\image\jellyfish.jpg’, SINGLE_BLOB ) AS y
— Insert the data to the table         
INSERT INTO test (ID,Number,Description, Image)
SELECT NEWID(), ‘MS1001′,’jellyfish’, @img

clip_image001[8]

4.To view the table with filestream included column

image

How to enable and configure Filestream in SQL SERVER 2008 / 2012

How to enable Filestream in SQL SERVER 2008 and SQL Server 2012?

Filestream was introduced in SQL Server 2008 for the storage and management of unstructured data.

Follow the below steps to enable this filestream in SQL Server2008.Let us see one by one.

To enable filestream through SQL Server configuration manager:

1.Open SQL Server configuration manager.Open SQL Server services

2.Select the instance for which you want to enable Filestream.Right click the instance->properties.

3.In the SQL Server Properties dialog box, click the Filestream tab.

4.Select the Enable Filestream for Transact-SQL access.

5.If you want to read and write Filestream data from Windows, click Enable Filestream for file I/O streaming access. Enter the name of the Windows share in the Windows Share Name box.

6.If remote clients must access the Filestream data that is stored on this share, select Allow remote clients to have streaming access to Filestream data.

7.Click Apply.

clip_image001[4]

Enable Filestream access level server configuration option:

In SQL Server Management Studio, click New Query.Execute the below query

[0 -Disables FILESTREAM,1 -Enables FILESTREAM for T-SQL,2 -Enables FILESTREAM for T-SQL and Win32 streaming access]

Syntax:

EXEC sp_configure filestream_access_level,2

RECONFIGURE with override

Create filestream enabled database:

  1. We can enable file stream while creating the database  (or) If the database is already created we can enable filestream using alter database.

To create file stream enable database you can use below query

CREATE DATABASE DBname
ON
PRIMARY ( NAME = test1,
    FILENAME = ‘c:\data\testdat1.mdf’),
FILEGROUP FileStreamGroup1 CONTAINS FILESTREAM( NAME = test3,
    FILENAME = ‘c:\data\test1’)
LOG ON  ( NAME = testlog1,
    FILENAME = ‘c:\data\test1.ldf’)
GO


Enable filestream on existing database:

To enable file stream on existing database you can use alter database  command with  SET FILESTREAM similar to the example below or SSMS 

ALTER DATABASE [DBNAME] SET FILESTREAM( NON_TRANSACTED_ACCESS = FULL, DIRECTORY_NAME = N’Directoryname’ ) WITH NO_WAIT
GO


Enable filestream for database using SQL Server 2008 Management Studio:

1. Connect to SQL Server Instance using SQL Server Management Studio

2. In the Object Explorer, right click the instance and select Properties.

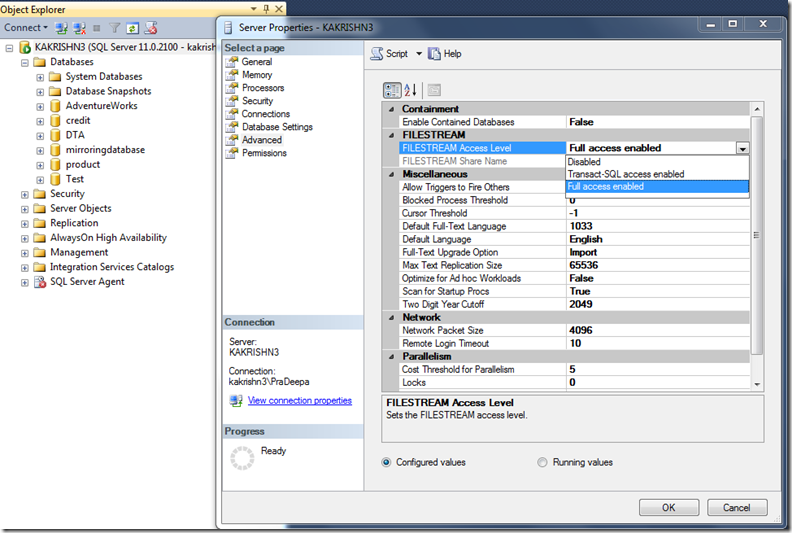
3. On the left panel click on the Advanced tab, then click on the drop down list of Filestream Access Level and select Full access enabled option.

image

4. Click Ok to save the changes.

How to import/Export data in SQL Server

SQL Server Import and Export Wizard can be used to copy data from a source to a destination. source and destination can be sqlserver or any other connection.

Steps to export data in SQL Server 2008:

In Microsoft SQL Server Management Studio, expand the databases.

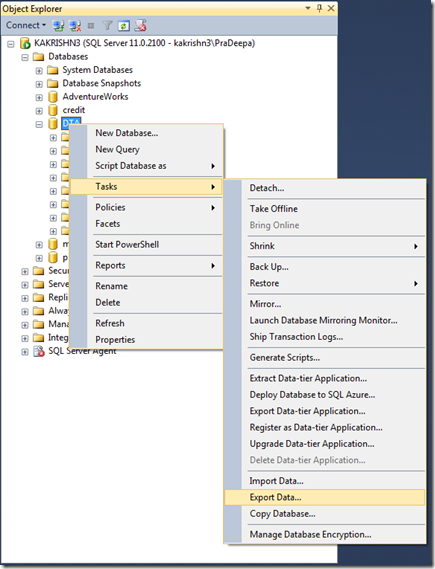
Right-Click on the database you want to copy to another database->Tasks->Export data/import data.

clip_image001

SQL Server Import and Export Wizard window will open.

clip_image001[4]

Click  Next to continue. Now, you will need to choose a Data Source. You can leave the Data source as SQL Server Native Client 11.0. Enter the Server name. Check windows Authentication  for your database. From the Database dropdown menu, select the name of your database.

clip_image001[22]

Click on Next to continue.

In the Choose a Destination window, you can select a different option to export to Microsoft Access, Microsoft Excel,SQL Server database,etc.,

clip_image001[26]

Then select the destination database,where you want to export your data.

clip_image001[24]

Specify whether to copy tables or to copy the results of a query from the data source.Click Next.

clip_image001[28]

Select source tables and click Next.

clip_image001[30]

Check Run immediately.Click Next.

clip_image001[32]

Click Finish to complete the wizard.

clip_image001[34]

Close the wizard after completing it successfully.

clip_image001[36]

Create script for all objects in database with data

You can create T-SQL scripts for database, objects in database and insert script for data in tables by using the Generate Scripts Wizard.

These scripts can be used to create database in secondary site with and with out data.

I this blog I will explain how to generate T-SQL script to create database, database objects and data.

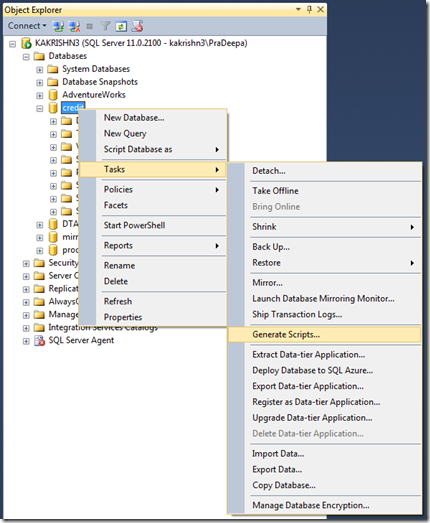
Right click the database which you want to script—>Select tasks—>Generate scripts.

clip_image001

 Generate and Publish Scripts wizard screen appears.click Next to continue.

clip_image001[4]

In the Choose Objects wizard screen Select “Script entire database and all database objects” option if want to script all the objects in database or select specified objects which you would like to script and click Next to continue.

clip_image001[6]

In the Set Scripting Options wizard screen.Select the output type as “Save scripts to a specific location” and specify the path where you would like to save the database script file .Click the Advanced button  for specifying the schema and data scripting option.

clip_image001[8]

In Advanced Scripting Options screen; choose the option Schema and data for the Types of data to script option if you want to generate insert scripts for rows in tables  and click OK to save the changes and to return to Set Scripting Options wizard screen.

a) Data only – If this option is selected, it will only script out data within the tables
b) Schema and data – If this option is selected, it will script out Schema as well as the data within the selected objects
c) Schema only – If this option is selected, it will script out the Schema only

clip_image001[10]

In the Summary wizard screen; you will be able to see a quick summary of all the options which you have selected so far. Click Next to confirm and generate the scripts.

clip_image001[12]

In Save or Publish Scripts wizard screen; you will be able to see a Success or Failure message against each object for which the script was requested to be generated. Finally, click Finish to close the wizard.

clip_image001[14]

Once the script is generated you can view it like any other SQL Script. 

clip_image001[16]

Steps to enable Alwayson in SQL Server 2012

Steps to configure Always on availability groups in SQL Server 2012

1. Always on availability groups can be configured in standalone or clustered SQL Server instance.

2. All SQL Server instance (principal and all replicas) must reside on servers which are part of same Windows Server Failover Cluster.

3. The server instance must be running an edition of SQL Server that supports AlwaysOn Availability Groups

To install and configure windows failover cluster follow the steps in HOW TO CREATE CLUSTER USING HYPER-V

Ensure all the systems which has SQL Server instances and will host principal and all replica databases are part of same windows cluster.  

Note: Windows failover cluster can be installed and configured without shared disk starting from windows2008 unlike windows2003.

Once the cluster is configured follow the below step by step guide to setup always on

In SQL Server Configuration Manager, click SQL Server Services, right-click SQL Server for which you want to enable AlwaysOn Availability Groups, and click Properties.

clip_image001[3]

Select the AlwaysOn High Availability tab.

Verify that Windows failover cluster name field contains the name of the failover cluster. If this field is blank, this server instance currently does not support AlwaysOn Availability Groups. Either the local computer is not a cluster node, the Windows Server Failover cluster has been shut down, or this edition of SQL Server 2012 that does not support AlwaysOn Availability Groups.

Select the Enable AlwaysOn Availability Groups check box, and click OK.

clip_image001[5]


Open SQL Server Management Studio.

Choose any one instance to become PRIMARY. Expand Alwayson High availability->Right-click Availability Groups and select New Availability Group wizard.

clip_image001[4]

New Availability group introduction window will appear,Click Next.

clip_image001[6]

Specify availability group name and click Next.

clip_image001[8]

Select the user databases for the availability group(Database Should have Full backup) and click Next.

clip_image001[16]

Specify an instance of SQL Server to host a secondary replica by selecting Add replica.

clip_image001[18]

Add NODE2 as secondary replica by connecting it.

clip_image001[20]

After selecting secondary replica,Optionally, you can specify endpoint details or leave them default.

clip_image001[22]

Set the backup preference.

clip_image001[24]

Specify your preference for an availability group listener that will provide a client connection point or else select do not create an availability group listener now. 

clip_image001[26]

Select your data synchronization preference as Full and specify a shared network location accessible by all replicas.

clip_image001[28]

Summary of availability group validation will be displayed,Click Next.

clip_image001[30]

Verify the choice made in this wizard.Click Finish.

clip_image001[32]

Wizard completed successfully,Click close and finish the availability group wizard.

clip_image001[34]

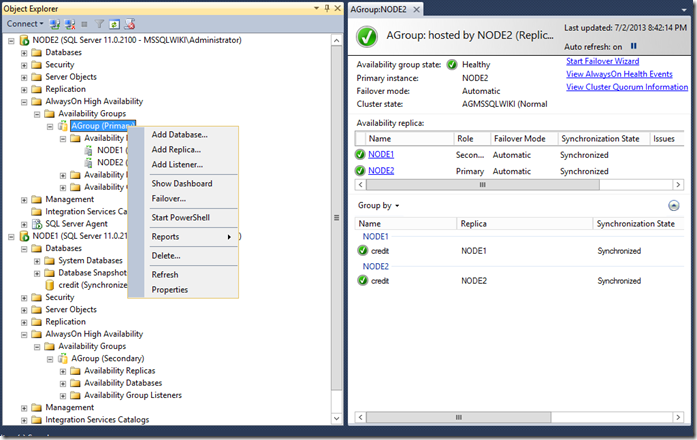
Successfully we have created a availability group called AGroup.

clip_image001[38]

You can suspend and resume data movement by expanding Availability groups->Group name->Availability databases->Choose the database –>resume or suspend database.

clip_image001[6]

You can view the synchronization status through the dashboard reports.

clip_image001

If you want to do a failover,right click the available group->group name->Failover.

clip_image001[4]

How to create database mirroring

What is database mirroring and  How to create database mirroring?

Database mirroring is software solution  for increasing database availability.It maintains two copies of single database,one as principal database and other as mirror database.So during disaster if primary database server fails then mirror database can be used by application to access the data.This reduces the down time caused during disasters. Mirrored database can not be accessed by application unless roles are switched (Transferring principal role to mirror server) but database snapshot can be created on mirrored database which can be used for read only queries (Load balancing). Refer SQL Server database snapshot steps to create snapshot   

Database  Mirroring can be  implemented  only on databases,that use the full recovery model. The simple and bulk-logged recovery models do not support database mirroring. 

Database mirroring is not applicable in system databases(master,msdb, tempdb, or model databases)

Database mirroring maintains two copies of a single database that must reside on different server instances of SQL Server Database Engine.

There are two mirroring operating modes.

1.High-safety mode:Commit changes at the principal and then transfer them to the mirror.It is asynchronous.

2.High-performance mode:Always commit changes at both the principal and mirror server.It is synchronous

All database mirroring sessions support only one principal server and one mirror server.

Steps to create mirroring:

I have two instances SQLPC\PRADEEPA  which will act as principal server and SQLPC\PK92 will act as mirrored server.

Choose a database in the principal instance which will act as Principal database,

I have created database named “Mirrordatabase” for which we are going to start mirroring.

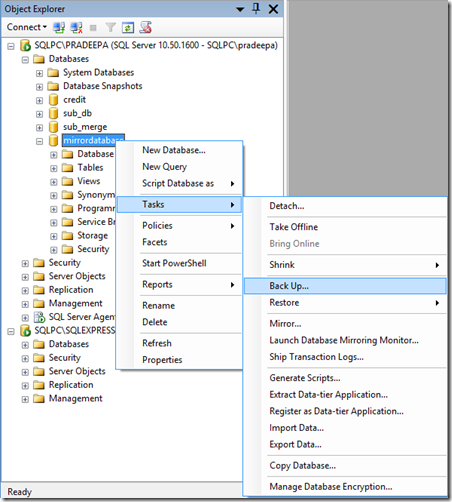
Create a backup for the Mirrordatabase in the principal server.

clip_image001

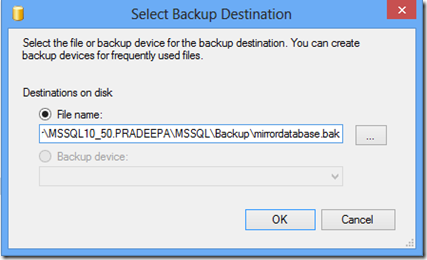
Set the backup type in full recovery mode.Select back up destination as disk.Select add to add the destination folder.

clip_image001[4]

  In destination,add the destination folder with .bak extension and click ok. 

clip_image002

Click ok and complete the backup. 

clip_image001[6]

Now restore the backup of the database in mirrored server (destination server) with same name.

clip_image001[8]

  Type the name of the database and restore the database from device.

clip_image002[4]

Select the backup file and click ok.

clip_image001[16]

Now backup location is added.click ok and continue.

clip_image001[18]

Select the backup sets to restore.Then click Options from select a page.

clip_image001[20]

Select the recovery state as RESTORE WITH NORECOVERY.Also change the restore file name in restore as if you are creating mirror on same server for testing.Click ok.

clip_image001[22]

Database restore completed successfully.

clip_image001[24]

Configure mirroring in primary database by selecting properties.

clip_image001[26]

In Database properties window select mirroring and configure it.

clip_image001[28]

Here we dont have witness server.But we can include witness server instance also.Click Next.

clip_image001[30]

Specify principal server instance,listener port and endpoint name.Click Next.

clip_image001[32]

Connect mirror server instance.

clip_image001[34]

Connect it.

clip_image001[36]

Click Next and continue.

clip_image001[38]

Service accounts could be created in this window.

clip_image001[40]

Click Finish and complete the wizard.

clip_image001[42]

Close the window after configuring database mirroring.

clip_image001[44]

Start the mirroring by clicking start mirroring.

clip_image001[46]

We could select either High performance mode or High safety mode based upon our application need from below window.

clip_image001[48]

Mirroring is successfully created. 

clip_image001[50]

You could perform failover between primary database and mirror database by selecting Failover option in properties window.

clip_image001[52]

How to create log shipping in SQL Server

What is log shipping and how to create log shipping in SQL Server 2008?

SQL Server Log shipping automatically allows you to send transaction log backups from a primary database on a primary server instance to one or more secondary databases on separate secondary server instances. The transaction log backups are applied to each of the secondary databases.

Log shipping can be used with databases using the full or bulk-logged recovery models.

Steps to create log shipping in SQL Server 2008:

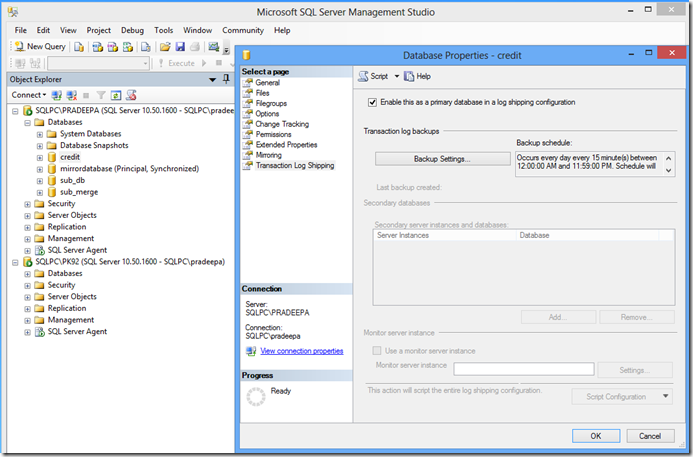
On the primary server, right click on the database for which you want to enable log shipping and select Properties. Then select the Transaction Log Shipping Page. Check the “Enable this as primary database in a log shipping configuration” check box.

clip_image001

Select Backup settings.Specify the network path to backup folder and Click ok.

clip_image001[4]

Select secondary database settings.Connect secondary server instance.

clip_image001[6]

After connecting,select the secondary database.

Then initialize secondary database by Specifying how you want to restore the backup in secondary database.

clip_image001[8]

Select copy files option.Specify the destination folder for copied files.

clip_image001[10]

Select the Restore transaction log option.Select the database mode as standby mode.Click ok.

clip_image001[12]

View the configuration options we selected and click ok.

clip_image001[14]

successfully we have  configured Log shipping.Click ok and finish the configuration. 

clip_image001[16]

HOW TO INSTALL SQL Server CLUSTER IN HYPER-V

To install SQL Server failover cluster we need to have windows cluster configured with a shared disk.

Step 1

If you do not have a windows cluster configured you can create using Hyper-v

Follow the steps in HOW TO CREATE CLUSTER USING HYPER-V to create Domain controller and two member servers which will act as nodes of the cluster.

Once the domain controller and two member servers are created proceed to step 2

Step 2

Once the domain controller and nodes are created install failover cluster feature and create cluster 

To install the failover cluster feature and create a cluster follow the steps in How to install cluster in windows 2008 and windows 2012

Step 3

Once the cluster is created we have to create shared Disk for installing failover aware clustered application like SQL Server.

Follow the steps in ”How to create shared disk using iSCSI Software Target” to create a shared disk using iSCSI target software.


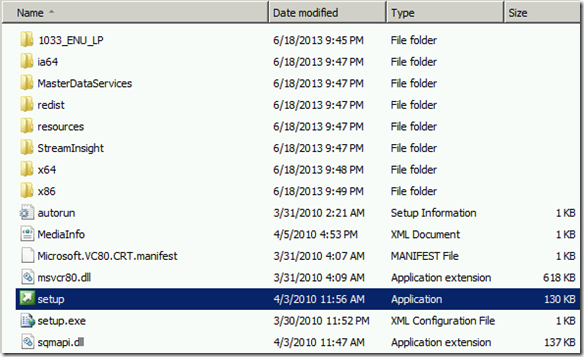
Once shared disk is configured invoke Setup from  SQL server installation media .Make sure the node in which you perform the  installation has shared disk online.

image

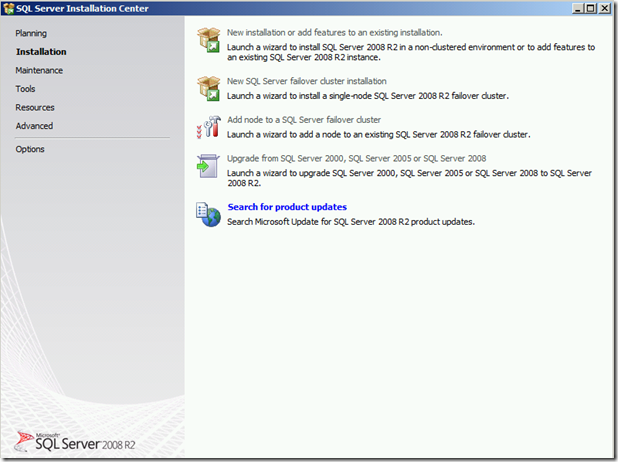
Run the setup.

Start the installation by selecting New SQL Server Failover Cluster Installation option.

image

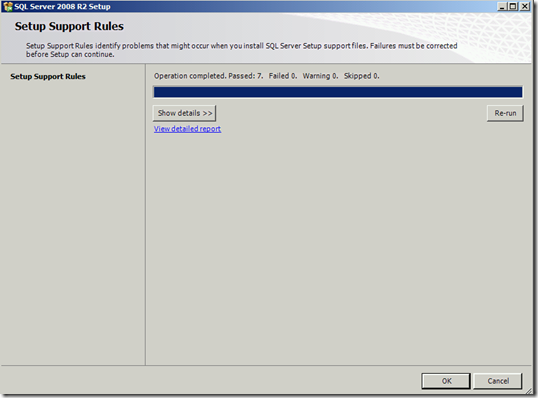
Setup support rules will analyze and identify the problems that might occur during setup installation.

clip_image001

After setup validation ,you will get details about operations completed,Click Next and continue

clip_image001[4]

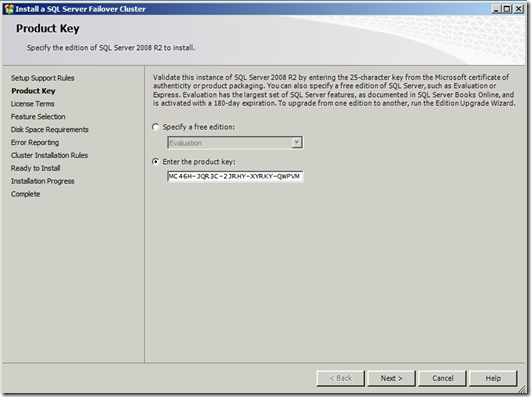
On the Product key page, specify the Product ID key of the product. Click Next.

image

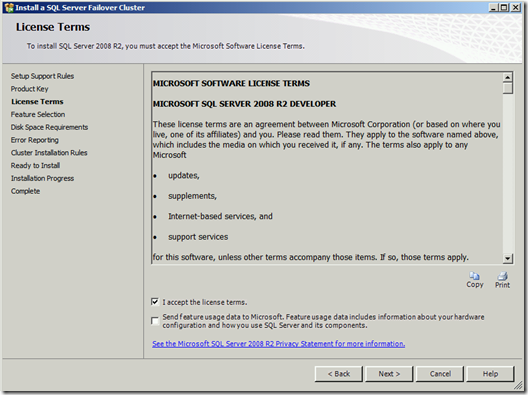
Then read and select the check box to accept terms and agreements.Click Next.

image

Select the developer features which you want and click Next.

clip_image001[6] 

Perform instance configuration.Give SQL server network name.Either you could have  default instance or named instance.But you could have only one default instance.

Click Next.

clip_image001[28]

Allocate required disk space for your installation.Click Next.

clip_image001[12]

Select the SQL Server cluster resource group name.Click Next and continue.

clip_image001[14]

Cluster disk selection will help us to view the disk we have selected for SQL Server failover cluster.

clip_image001[16]

Configure the network resource for your SQL Server failover cluster.Select DHCP check box if you are going to use DHCP network.Otherwise give the IP address for your network(IP address which you provide not be in use currently).

clip_image001[18]

Select the database engine domain group and SQL Server agent domain group. These groups have to be pre created in AD before the installation and startup account of SQL Server services will be added to these groups.  You can also use service SIDs option.

clip_image001[20]

Specify the  account name and password for SQL server agent and SQL server database engine.Click Next.

clip_image001[24]

Specify the authentication mode for your SQL Server failover cluster.Click Next and continue your installation.Verify the cluster installation rules.

clip_image001[26]

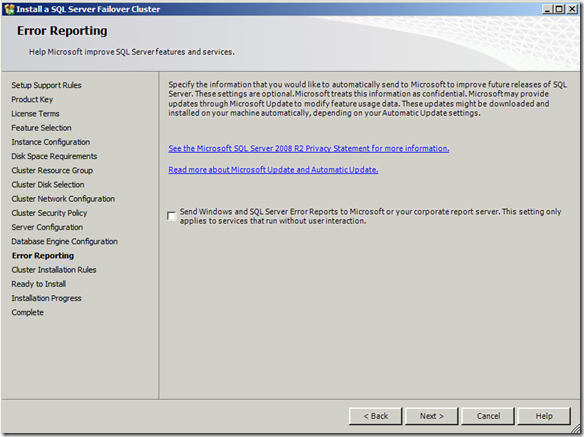
  Enable error reporting service if you want or else,click Next and continue.

image

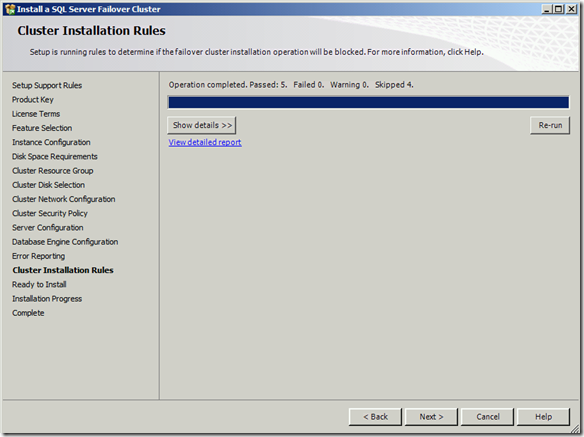
Cluster installation rules will run the setup to determine whether any operations will block the installation.After operation completes.Click Next and continue. 

image

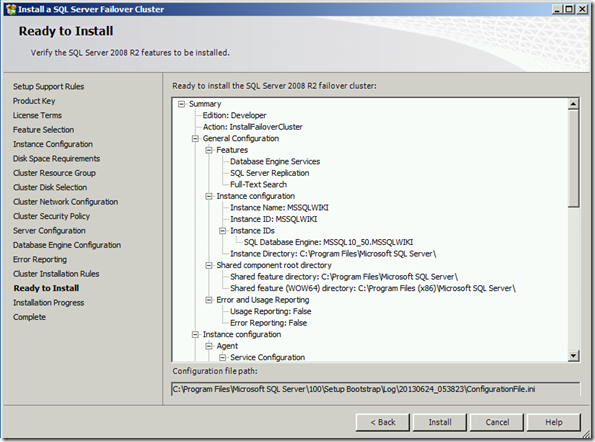
Ready to install page will display the summary of options which we have selected during the setup process.If you want to make any changes,go back and make the required changes or else Click Install and start the installation.

image

Click Close and Complete the installation process.

clip_image001[1]

Successfully we have installed the SQL server failover cluster in first node.

clip_image001[30]

We can install the SQL server failover cluster in remaining nodes by selecting Add node to a SQL Server failover cluster in  installation centre window. To add node to existing SQL Server failover cluster follow the steps in How to add node to SQL Server cluster


How to create merge replication in SQL Server

How to create merge replication in SQL Server?

For all types of replication it is mandatory to create distribution for the publisher instance before configuring replication. For configuring distribution follow the steps in “How to configure distribution for replication

Once the distribution is configured follow the below steps to create publisher

Let us create New publisher:

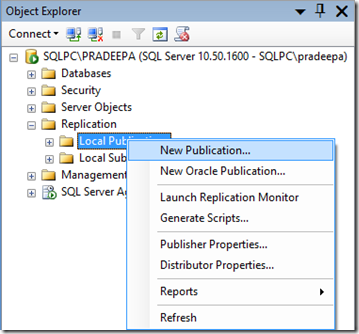
Right click Local publication->New Publication

clip_image001

New publication wizard appears.Click Next and continue.


clip_image001[4]

Select the database that contains the data or objects you want to publish.Click Next.

clip_image001[6]

There are different types of publication.

Select the publication type that supports your application.Click Next.

clip_image001[8]

Specify the SQL Server version that will be used by subscribers for this publication.Click Next.

clip_image001[10]

Select the tables to publish as articles.Click Next.

clip_image001[12]

If you don’t have unique identifier in the table.Then SQL Server will automatically add unique identifier to the table.Click Next.

clip_image001[14]

Add filters to exclude unwanted rows from published tables.Click Next.

clip_image001[16]

Specify when to run the snapshot agent and click Next.

clip_image001[18]

Select security settings.

clip_image001[20]

Specify the domain or machine account under which the snapshot agent process will run.

Select Run under the SQL Server agent service account.Click ok.

clip_image001[22]

After selecting the account for snapshot agent and log reader agent,click Next.

clip_image001[24]

Check create the publication.Click Next.

clip_image001[26]

Give the publication name and finish the wizard.

clip_image001[28]

Close the window after creating publication successfully.

clip_image001[30]


clip_image001[32]

Let us create the subscribers:

Before creating subscribers create one empty database where we could subscribe the publisher database.

Right click Local subscriptions->New subscriptions’

clip_image001[34]


New subscription wizard window appears.Click Next and continue.

clip_image001[36]

Choose the publisher and click next.

clip_image001[38]

Select the distributor agent location.Click Next.

clip_image001[40]

Select subscription database which you created.The database should be empty database.Click Next.

clip_image001[42]

Specify the process account and connection option for each distribution agent.

clip_image001[46]

Specify the domain or machines account under which the distribution agent process will run and click ok.

clip_image001[44]


Schedule the agent and click Next.

clip_image001[48]

Specify the type of subscription as client or server and click Next.

clip_image001[50]

Check create the subscription and click Next.

clip_image001[52]

Click Finish and complete the wizard.

clip_image001[54]

Close the window after creating subscription.

clip_image001[56]

Successfully we have created publisher,distributor and subscriber for merge replication.

clip_image001[58]

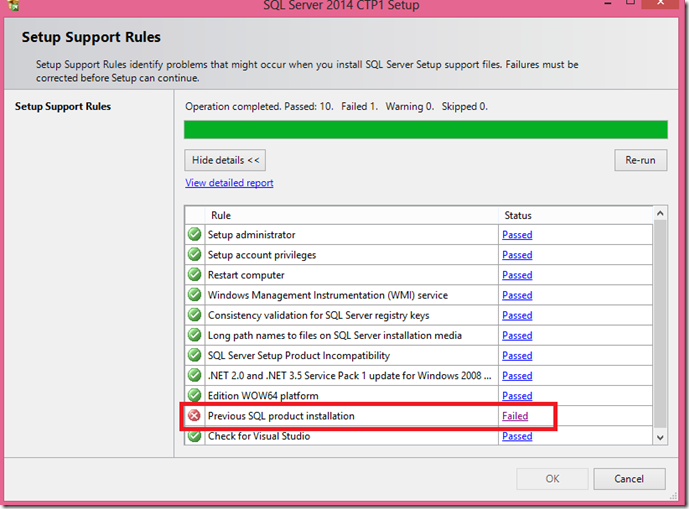
A SQL product other than SQL Server 2014 CTP1 is detected. You cannot install this release until the existing instances of SQL products are uninstalled

When you install SQL Server 2014 set support rules would fail in “SQL product installation rule” with below error

—————————
Rule Check Result
—————————
Rule “Previous SQL product installation” failed. Â
A SQL product other than SQL Server 2014 CTP1 is detected. You cannot install this release until the existing instances of SQL products are uninstalled.

—————————
OKÂ Â Â
——————–

image

Cause

SQL Server 2014 CTP 1 is prerelease software and should be installed only on a clean machine with no other SQL Server instance.

More details in http://msdn.microsoft.com/en-us/library/dn169381(v=sql.15).aspx

Extract from above link

{

1.1 Limitations and Restrictions in SQL Server CTP 1

Issue: The following sections define the limitations and restrictions that apply to SQL Server CTP 1.

1.1.1 General limitations and restrictions
  • SQL Server 2014 CTP 1 is prerelease software and should be installed only on a clean machine.

  • SQL Server 2014 CTP 1 is a NON-PRODUCTION release and should not be installed and used in production environments.

  • SQL Server 2014 CTP 1 may contain branding from Microsoft SQL Server 2012 and is versioned as 11.0.

  • SQL Server 2014 CTP 1 is only available in the English language.

  • Microsoft SQL Server 2014 CTP 1 is not supported by Microsoft Customer Services and Support (CSS).

}

How to start replication agent in command prompt.

In this blog I will explain how to run replication agents from command prompt and enable additional parameters for agent’s while running from command prompt.

All the replication agent’s  (Snapshot agent, Logreader agent, distributor agent, Merge agent) can be run from command prompt.

All these replication agents will have corresponding exe in C:\Program files\Microsoft SQL Server\100\COM  folder

Snapshot agent –>Snapshot.exe

Logreader agent—>Logread.exe

distributor agent  –>Distrib.exe

Merge agent  –>Replmerge.exe

Before we start running the replication agents from command prompt we have to stop and disable the corresponding agent job in management studio by expanding jobs->Right click job->Stop Job

clip_image001[20]  

After stopping the job.Disable it.

clip_image001[22]

Copy the folder path in which replication agent exe’s are located ( C:\Program files\Microsoft SQL Server\100\COM  I have highlighted the agent binaries for visibility)

clip_image001[4] 

Open a command prompt and Change the directory to C:\Program files\Microsoft Sql Server\100\COM in command prompt.

clip_image001

Running Logreader agent from command prompt:

Double click Log reader Job.

  clip_image001[6]

Select steps –>Double click Run agent.

clip_image001[10]

Copy the command and paste it in command prompt.

clip_image001[8]

To run Log read agent from cmd  type logread.exe in command prompt.Then paste the command that you copied from Job step properties.

clip_image001[12]

We can monitor the progress of agent from  command prompt.

clip_image001[14]

We can also add additional parameters when we run the agents from command prompt. I will show you how to add  verbose level parameter to increase the level of logging when running agent from CMD. (–Outputverboselevel 3 increases the level of logging by replication agents).

clip_image001[40]

Like below.

clip_image001[42]

Running Replication distributor agent:

Double click the distributor job.

clip_image001[16]

Then select steps->Run agent.

clip_image001[18]

Copy the command.

clip_image001[24]

Change the directory to C:\Program files\Microsoft SQL Server\100\COM.

Then give distrib.exe –>copy the command from Job step properties.

clip_image001[28]

Now we could start distributor agent in command prompt itself.

clip_image001[30]

Running Snapshot agent:

Double click snapshot agent.

clip_image001[32]

Select Steps->Run agent.

clip_image001[34]

Change the directory to C:\Program files\Microsoft SQL Server\100\COM.

Then give snapshot.exe –>copy the command from Job step properties.

clip_image001[36]

Then we could start the snapshot agent in command prompt.

clip_image001[38]

How to create transactional replication in SQL Server

How to create transactional replication in SQL Server?

Replication allows as to automatically distribute copies of data from one server to one or more distributor server.In replication we will have Distributor,Publisher and Subscriber.

In  transactional replication  snapshot of the publication database objects and data is saved.If there is any data changes and schema modifications made at the Publisher,it will be delivered to the Subscriber. The data changes are applied to the Subscriber in the same order and within the same transaction boundaries as they occurred at the Publisher.Therefore, within a publication, transactional consistency is guaranteed. 

Transaction replication has three agents namely,Snapshot agent,Log reader agent and distribution agent .

The Snapshot Agent is an executable file that prepares snapshot files containing schema and data of published tables and database objects, stores the files in the snapshot folder.

The  Log Reader Agent monitors the transaction log of each database that is configured for transactional replication and copies the transactions from the transaction log into the distribution database.

The  Distribution Agent is an executable that moves the snapshot and the transactions held in the distribution database tables to the destination tables at the Subscribers.

For all types of replication it is mandatory to create distribution for the publisher instance before configuring replication. For configuring distribution follow the steps in “How to configure distribution for replication

Once the distribution is configured follow the below steps to create publisher

Let us create New publisher:

Right click Local publication->New Publication

 clip_image001[16]

New publication wizard appears.Click Next and continue.

clip_image001[18]

Select the database that contains the data or objects you want to publish.Click Next.

clip_image001[20]

There are different types of publication.

Select the publication type that supports your application.Click Next.

clip_image001[22]

Select the tables to publish  as articles.Click Next.

clip_image001[24]

Add filters to exclude unwanted rows from published tables.Click Next.

clip_image001[26]

Specify when to run the snapshot agent and click Next.

clip_image001[28]

Select  security settings

clip_image001[30]

Specify the domain or machine account under which the snapshot agent process will run.

Select Run under the SQL Server agent service account.Click ok.

clip_image001[32]

After selecting the account for snapshot agent and log reader agent,click Next.

clip_image001[34]

Check create the publication.Click Next.

clip_image001[36]

Give the publication name and finish the wizard.

clip_image001[38]

Close the window after creating publication successfully.

clip_image001[40]

Let us create the subscribers:

Before creating subscribers create one empty database where we could subscribe the publisher database.

Right click Local subscriptions->New subscriptions’

clip_image001[42]

New subscription wizard window appears.Click Next and continue.

clip_image001[44]

Choose the publisher and click next.

clip_image001[46]

Select the distributor agent location.Click Next.

clip_image001[48]

Select subscription database which you created.The database should be empty database.Click Next.

clip_image001[50]

Specify the process account and connection option for each distribution agent.

clip_image001[52]

Specify the domain or machines account under which the distribution agent process will run and click ok.

clip_image001[54]

Schedule the agent and click Next.

clip_image001[56]

Initialize the subscription as immediately and click next.

clip_image001[58]

Check  create the subscription and click Next.

clip_image001[60]

Click Finish and complete the wizard.

clip_image001[62]

Close the window after creating subscription.

clip_image001[64]

Launch replication monitor to view the connection.

To open Replication monitor Right click Replication->Launch replication monitor. 

clip_image001[66]

Successfully we have created publisher,distributor and subscriber.

clip_image001[68]

How to configure distribution for replication

Replication allows as to automatically distribute copies of data from one server to one or more distributor server.In replication we will have Distributor,Publisher and Subscriber. 

First we have to configure a Distributor to set up replication.Distributor is a server that contains the distribution database.It  stores all the transactions for transactional replication and meta data for all types of replication .  Each Publisher can have only one Distributor instance.But multiple publishers can share one Distributor.We can also Configure a centralized Distributor for multiple Publishers.

There are two types of distributor

1.Local distributor.

2.Remote distributor. 

Let us see how to configure distribution:

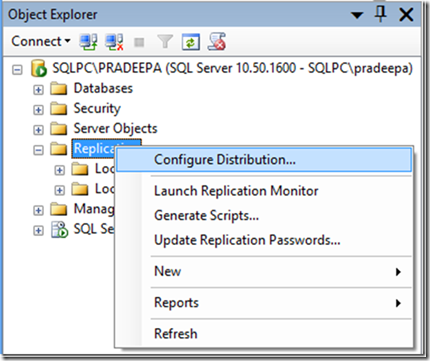
Right click Replication->Configure distribution

clip_image0014_thumb1

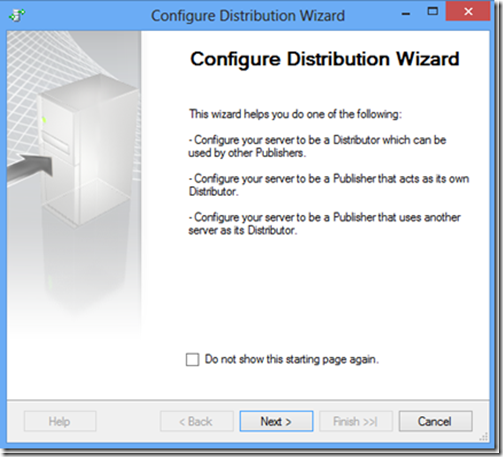
Configuration Distribution wizard window will appear.Click Next and continue.

clip_image0016_thumb2

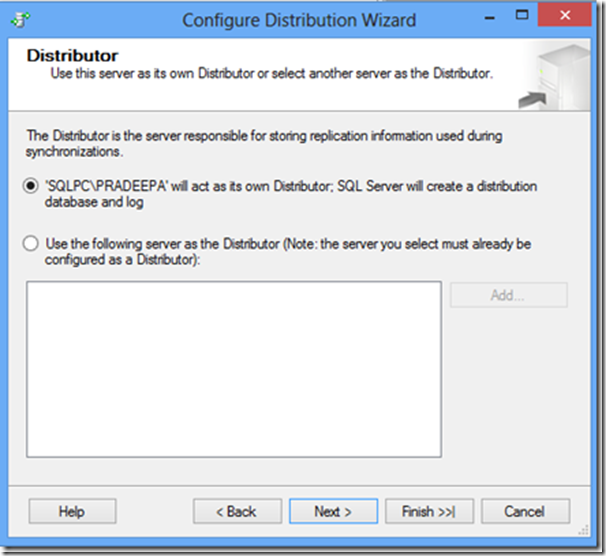
Select the distributor which will act as server and responsible for storing replication information used during synchronizations. If you want to choose  remote  distributor select the second option.

image_thumb3

Configure SQL Server agent to start  automatically.To start the sever agent automatically, when computer is started.Click Next and continue.

image_thumb6

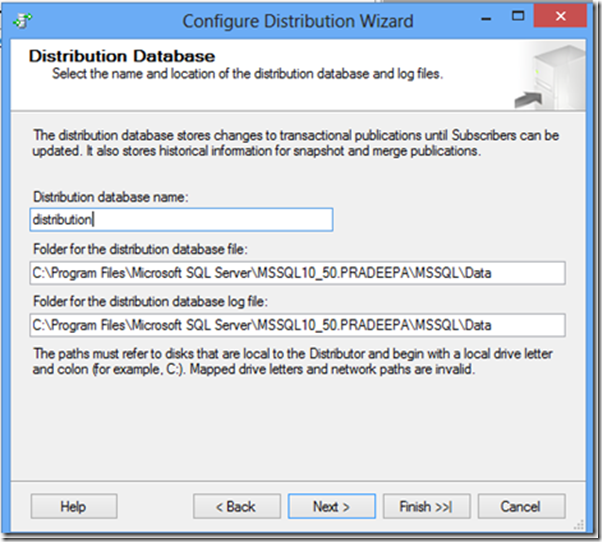
Specify the distribution database name.Also specify the valid path for database file and log file.Click Next

clip_image0018_thumb1

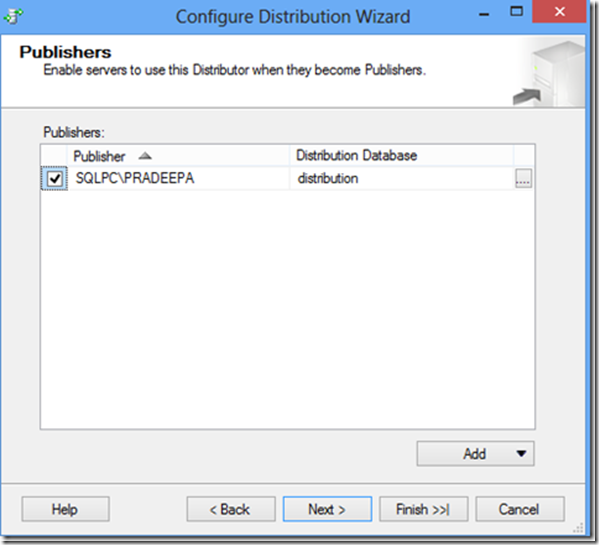
Enable the servers which will use the distributor when they become publishers.

clip_image00110_thumb1

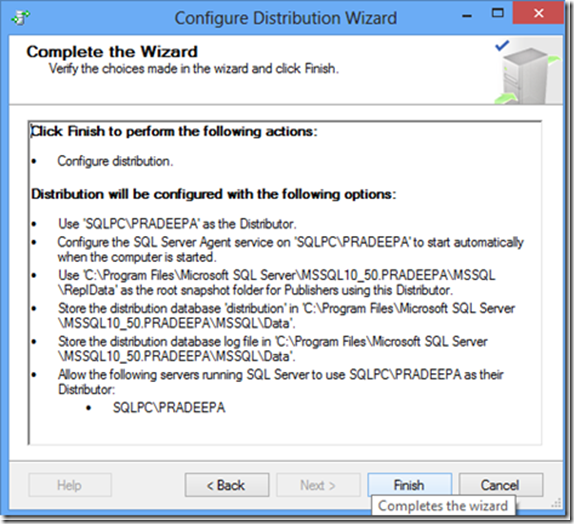
In complete wizard window,we will get the options which we selected during the process.Click Finish.

image_thumb5

Close the wizard and complete the distribution database creation. 

clip_image00114_thumb1