Steps to configure Always on availability groups in SQL Server 2012
1. Always on availability groups can be configured in standalone or clustered SQL Server instance.
2. All SQL Server instance (principal and all replicas) must reside on servers which are part of same Windows Server Failover Cluster.
3. The server instance must be running an edition of SQL Server that supports AlwaysOn Availability Groups
To install and configure windows failover cluster follow the steps in HOW TO CREATE CLUSTER USING HYPER-V
Ensure all the systems which has SQL Server instances and will host principal and all replica databases are part of same windows cluster.
Note: Windows failover cluster can be installed and configured without shared disk starting from windows2008 unlike windows2003.
Once the cluster is configured follow the below step by step guide to setup always on
In SQL Server Configuration Manager, click SQL Server Services, right-click SQL Server for which you want to enable AlwaysOn Availability Groups, and click Properties.
Select the AlwaysOn High Availability tab.
Verify that Windows failover cluster name field contains the name of the failover cluster. If this field is blank, this server instance currently does not support AlwaysOn Availability Groups. Either the local computer is not a cluster node, the Windows Server Failover cluster has been shut down, or this edition of SQL Server 2012 that does not support AlwaysOn Availability Groups.
Select the Enable AlwaysOn Availability Groups check box, and click OK.
Open SQL Server Management Studio.
Choose any one instance to become PRIMARY. Expand Alwayson High availability->Right-click Availability Groups and select New Availability Group wizard.
New Availability group introduction window will appear,Click Next.
Specify availability group name and click Next.
Select the user databases for the availability group(Database Should have Full backup) and click Next.
Specify an instance of SQL Server to host a secondary replica by selecting Add replica.
Add NODE2 as secondary replica by connecting it.
After selecting secondary replica,Optionally, you can specify endpoint details or leave them default.
Set the backup preference.
Specify your preference for an availability group listener that will provide a client connection point or else select do not create an availability group listener now.
Select your data synchronization preference as Full and specify a shared network location accessible by all replicas.
Summary of availability group validation will be displayed,Click Next.
Verify the choice made in this wizard.Click Finish.
Wizard completed successfully,Click close and finish the availability group wizard.
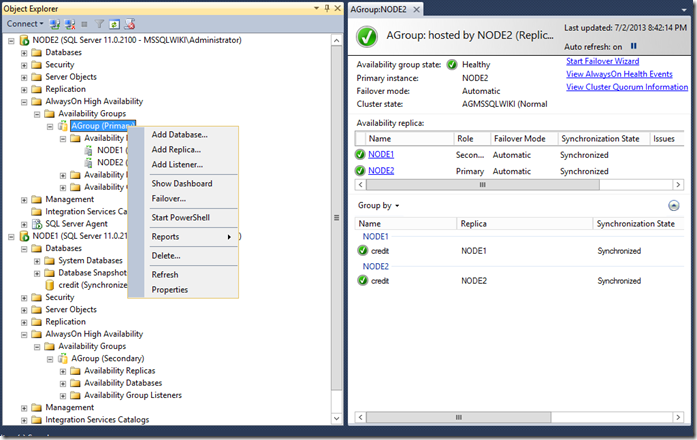
Successfully we have created a availability group called AGroup.
You can suspend and resume data movement by expanding Availability groups->Group name->Availability databases->Choose the database –>resume or suspend database.
You can view the synchronization status through the dashboard reports.
If you want to do a failover,right click the available group->group name->Failover.
![clip_image001[3] clip_image001[3]](https://sqlserverscribbles.files.wordpress.com/2013/07/clip_image0013_thumb.png?w=825&h=226)
![clip_image001[5] clip_image001[5]](https://sqlserverscribbles.files.wordpress.com/2013/07/clip_image0015_thumb.png?w=512&h=593)
![clip_image001[4] clip_image001[4]](https://sqlserverscribbles.files.wordpress.com/2013/07/clip_image0014_thumb2.png?w=484&h=414)
![clip_image001[6] clip_image001[6]](https://sqlserverscribbles.files.wordpress.com/2013/07/clip_image0016_thumb2.png?w=489&h=455)
![clip_image001[8] clip_image001[8]](https://sqlserverscribbles.files.wordpress.com/2013/07/clip_image0018_thumb2.png?w=448&h=415)
![clip_image001[16] clip_image001[16]](https://sqlserverscribbles.files.wordpress.com/2013/07/clip_image00116_thumb2.png?w=456&h=424)
![clip_image001[18] clip_image001[18]](https://sqlserverscribbles.files.wordpress.com/2013/07/clip_image00118_thumb1.png?w=457&h=426)
![clip_image001[20] clip_image001[20]](https://sqlserverscribbles.files.wordpress.com/2013/07/clip_image00120_thumb1.png?w=451&h=343)
![clip_image001[22] clip_image001[22]](https://sqlserverscribbles.files.wordpress.com/2013/07/clip_image00122_thumb1.png?w=442&h=411)
![clip_image001[24] clip_image001[24]](https://sqlserverscribbles.files.wordpress.com/2013/07/clip_image00124_thumb1.png?w=460&h=426)
![clip_image001[26] clip_image001[26]](https://sqlserverscribbles.files.wordpress.com/2013/07/clip_image00126_thumb1.png?w=456&h=424)
![clip_image001[28] clip_image001[28]](https://sqlserverscribbles.files.wordpress.com/2013/07/clip_image00128_thumb1.png?w=453&h=423)
![clip_image001[30] clip_image001[30]](https://sqlserverscribbles.files.wordpress.com/2013/07/clip_image00130_thumb1.png?w=440&h=409)
![clip_image001[32] clip_image001[32]](https://sqlserverscribbles.files.wordpress.com/2013/07/clip_image00132_thumb1.png?w=439&h=408)
![clip_image001[34] clip_image001[34]](https://sqlserverscribbles.files.wordpress.com/2013/07/clip_image00134_thumb1.png?w=446&h=413)
![clip_image001[38] clip_image001[38]](https://sqlserverscribbles.files.wordpress.com/2013/07/clip_image00138_thumb1.png?w=420&h=494)
![clip_image001[6] clip_image001[6]](https://sqlserverscribbles.files.wordpress.com/2013/07/clip_image0016_thumb3.png?w=455&h=563)

![clip_image001[4] clip_image001[4]](https://sqlserverscribbles.files.wordpress.com/2013/07/clip_image0014_thumb3.png?w=459&h=570)