One of the mandatory requirement to install SQL Server and similar application in cluster is to have shared disk.
I will explain how to create shared disk using iSCSI software target in this blog. You can download iSCSI Software Target from This link.
Installing Microsoft iSCSI software target.
When you invoke the self extracting package from downloaded above link it extracts X64 and x86 version of installer.
- Select iSCSI_target for installation on the system which will act as iSCSI target. We will create iSCSI target disks in this machine and these disks will be shared by nodes using iSCSI initiator.
- Select iSCSItargetClient_public and install in nodes in which you would like to have shared disk probably all nodes which is going to be part of cluster you are installing.
INSTALLATION IN CLUSTER NODES:(Follow same steps in all the nodes which will be part of cluster which you are installing)
Install iSCSItargetClient _public in all nodes which are going to be part of cluster which you are installing .
Run the file to start the installation.
Click Next and continue
Select the type of installation as Typical.
Specify users account that is member of administrators group in system which is acting iSCSI target and iSCSI initiator (current system).
Configure other settings.
Start the installation by clicking Install button.
Click finish to complete the installation
Install the iSCSI_target on the system which will act as iSCSI target probably file server (or) Domain controller if you are installing failover clustering for testing.
CONFIGURE iSCSI INITIATOR IN CLUSTER NODE’S:
After installation,Open ISCSI initiator.
- Select yes and continue.
- Type the target server name and click on Quick Connect
(Or)
- Click Discover panel and select the target sever.
- Give the server IP address.Click ok.
Similarly Follow the above steps and select the target in all nodes of cluster.
Configuring iSCSI target
Now after selecting the target,we have to add the all the iSCSI clients in iSCSI target.
Open MS iSCSI Target in system which is acting as iSCSI target.
Right click iSCSI target->create ISCSI target.
Create target wizard will open.
Specify the target node name,click Next.
Browse and select the iSCSI initiator,click ok.
Selected initiator will appear.Click Next.
Click Finish and complete the target creation.
Target Node1 is added.
Follow the above steps in all nodes.
CREATING VIRTUAL DISK FOR ALL NODES:
To create virtual disk in iSCSI target right click Node1->Create virtual disk.
Click Next.
Specify the file name which will be used as virtual disk.Specify it with .vhd extension.Click Next.
Specify the size for your virtual disk.Click Next.
Click Finish.
For node2,Right click Node2->Add Existing virtual disk to iSCSI target.
Click OK.
CLUSTER NODES:
Now after adding the nodes as target in DC,we have to initiate the server in cluster nodes.
Select iSCSI initiator.Click Refresh,if you didn’t get any discovered target.
Select the target and connect it.Click OK.
Open Disk management in cluster nodes:
Right click Disk1->Online
Again ,Right click Disk1->New Simple Volume.
New Simple Volume Wizard->Format this volume with the following setting.Click Next.
Then Finish the setting.
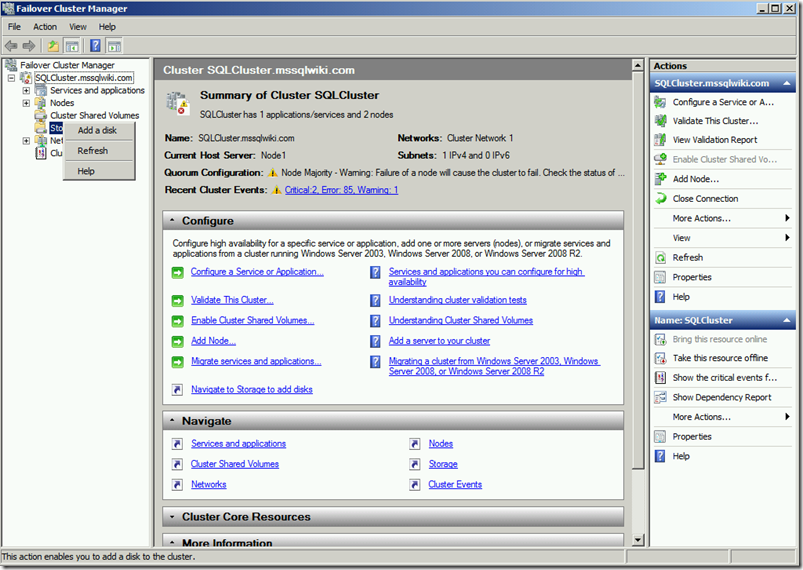
Open Failover cluster manager.Expand SQL Cluster.mssql.wiki.com.
Storage->Add a disk.
Click OK and add disk to a cluster.
Disk is added. (If disk is created for one node,automatically it will be shared by other node)
Now the shared disk is ready for use and can be used for installation of SQL Server cluster (or) any other cluster aware application which needs shared disk.
![clip_image001[6] clip_image001[6]](https://sqlserverscribbles.files.wordpress.com/2013/06/clip_image0016_thumb.png?w=806&h=609)
![clip_image001[12] clip_image001[12]](https://sqlserverscribbles.files.wordpress.com/2013/06/clip_image00112_thumb.png?w=608&h=460)
![clip_image001[16] clip_image001[16]](https://sqlserverscribbles.files.wordpress.com/2013/06/clip_image00116_thumb.png?w=625&h=470)
![clip_image001[18] clip_image001[18]](https://sqlserverscribbles.files.wordpress.com/2013/06/clip_image00118_thumb.png?w=560&h=428)
![clip_image001[20] clip_image001[20]](https://sqlserverscribbles.files.wordpress.com/2013/06/clip_image00120_thumb.png?w=671&h=515)
![clip_image001[22] clip_image001[22]](https://sqlserverscribbles.files.wordpress.com/2013/06/clip_image00122_thumb.png?w=645&h=482)
![clip_image001[24] clip_image001[24]](https://sqlserverscribbles.files.wordpress.com/2013/06/clip_image00124_thumb.png?w=657&h=535)
![clip_image001[26] clip_image001[26]](https://sqlserverscribbles.files.wordpress.com/2013/06/clip_image00126_thumb.png?w=451&h=177)
![clip_image001[28] clip_image001[28]](https://sqlserverscribbles.files.wordpress.com/2013/06/clip_image00128_thumb.png?w=448&h=627)
![clip_image001[30] clip_image001[30]](https://sqlserverscribbles.files.wordpress.com/2013/06/clip_image00130_thumb.png?w=399&h=562)
![clip_image001[32] clip_image001[32]](https://sqlserverscribbles.files.wordpress.com/2013/06/clip_image00132_thumb.png?w=492&h=689)
![clip_image001[34] clip_image001[34]](https://sqlserverscribbles.files.wordpress.com/2013/06/clip_image00134_thumb.png?w=763&h=627)
![clip_image001[36] clip_image001[36]](https://sqlserverscribbles.files.wordpress.com/2013/06/clip_image00136_thumb.png?w=763&h=567)
![clip_image001[38] clip_image001[38]](https://sqlserverscribbles.files.wordpress.com/2013/06/clip_image00138_thumb.png?w=534&h=402)
![clip_image001[40] clip_image001[40]](https://sqlserverscribbles.files.wordpress.com/2013/06/clip_image00140_thumb.png?w=630&h=479)
![clip_image001[42] clip_image001[42]](https://sqlserverscribbles.files.wordpress.com/2013/06/clip_image00142_thumb.png?w=650&h=494)
![clip_image001[44] clip_image001[44]](https://sqlserverscribbles.files.wordpress.com/2013/06/clip_image00144_thumb.png?w=630&h=481)
![clip_image001[46] clip_image001[46]](https://sqlserverscribbles.files.wordpress.com/2013/06/clip_image00146_thumb.png?w=570&h=436)
![clip_image001[48] clip_image001[48]](https://sqlserverscribbles.files.wordpress.com/2013/06/clip_image00148_thumb.png?w=643&h=478)
![clip_image001[52] clip_image001[52]](https://sqlserverscribbles.files.wordpress.com/2013/06/clip_image00152_thumb.png?w=669&h=503)
![clip_image001[54] clip_image001[54]](https://sqlserverscribbles.files.wordpress.com/2013/06/clip_image00154_thumb.png?w=694&h=562)
![clip_image001[56] clip_image001[56]](https://sqlserverscribbles.files.wordpress.com/2013/06/clip_image00156_thumb.png?w=649&h=515)
![clip_image001[58] clip_image001[58]](https://sqlserverscribbles.files.wordpress.com/2013/06/clip_image00158_thumb.png?w=680&h=536)
![clip_image001[60] clip_image001[60]](https://sqlserverscribbles.files.wordpress.com/2013/06/clip_image00160_thumb.png?w=735&h=546)
![clip_image001[62] clip_image001[62]](https://sqlserverscribbles.files.wordpress.com/2013/06/clip_image00162_thumb.png?w=472&h=560)
![clip_image001[64] clip_image001[64]](https://sqlserverscribbles.files.wordpress.com/2013/06/clip_image00164_thumb.png?w=594&h=483)
![clip_image001[66] clip_image001[66]](https://sqlserverscribbles.files.wordpress.com/2013/06/clip_image00166_thumb.png?w=609&h=596)
![clip_image001[68] clip_image001[68]](https://sqlserverscribbles.files.wordpress.com/2013/06/clip_image00168_thumb.png?w=762&h=620)
![clip_image001[70] clip_image001[70]](https://sqlserverscribbles.files.wordpress.com/2013/06/clip_image00170_thumb.png?w=743&h=561)
![clip_image001[72] clip_image001[72]](https://sqlserverscribbles.files.wordpress.com/2013/06/clip_image00172_thumb.png?w=782&h=260)
![clip_image001[76] clip_image001[76]](https://sqlserverscribbles.files.wordpress.com/2013/06/clip_image00176_thumb.png?w=525&h=401)

![clip_image001[4] clip_image001[4]](https://sqlserverscribbles.files.wordpress.com/2013/06/clip_image0014_thumb.png?w=449&h=468)
![clip_image001[8] clip_image001[8]](https://sqlserverscribbles.files.wordpress.com/2013/06/clip_image0018_thumb.png?w=818&h=585)